Use Single Stitch ![]() to create single stitches that will be embroidered at whatever length they are made, or at a maximum length that you define.
to create single stitches that will be embroidered at whatever length they are made, or at a maximum length that you define.
Note: Single stitches are represented by a line in the currently selected color. They are useful as short traveling stitches, and to achieve various hand stitching effects.
Select Single Stitch
-
Click Single Stitch
 in the Freehand Create toolbar.
 -
Click Single Stitch
 in the Point Create toolbar.
 -
Choose Create > Single Stitch.
-
Press ^I
Create Single Stitches
-
Click Single Stitch
 in the Freehand Create toolbar, or the Point Create toolbar.
 -
Click on the work area to place a stitch. A single stitch is placed from the previous object in the design, to where you clicked. It uses the currently selected color.
-
Click to place two more long single stitches.
-
Control–click one of the single stitches in the FilmStrip and choose Properties.
-
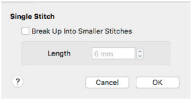
Select Break Up Into Smaller Stitches in the Single Stitch dialog.
Break Up into Smaller Stitches breaks each stitch up into stitches of Running Stitch at any length from 1mm to 12mm. The initial setting is 6mm. -
Set Length to 2mm and click OK.
-
Click the Design Player button on the toolbar.
-
Drag the slider to the right to play through the stitches. The single stitch that you changed has been broken up into smaller stitches.
-
Control–click and choose Finish Single Stitch Tool to stop placing single stitches.
