Use Alignment Stitches ![]() to add stitches to an embroidery that you can use to align the embroidery, for example with a patterned fabric, or another section of the embroidery project, or to a background picture.
to add stitches to an embroidery that you can use to align the embroidery, for example with a patterned fabric, or another section of the embroidery project, or to a background picture.
A marker

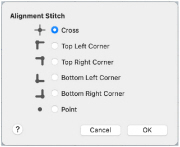
for a Cross alignment stitch is initially placed. This can be changed to: Cross, Top Left Corner, Top Right Corner, Bottom Left Corner, Bottom Right Corner and Point.
Add an alignment stitch
-
Click Alignment Stitches
 in the Freehand Create toolbar, then click to place a stitch on the work area.
 -
Click Alignment Stitches
 in the Point Create toolbar, then click to place a stitch on the work area.
 -
Choose Create > Alignment Stitches, then click to place a stitch on the work area.
Add Alignment Stitches to an Embroidery
-
Click Alignment Stitches

in the Freehand Create toolbar, or the Point Create toolbar.
-
Click the point on the embroidery design or picture where you want to add an alignment stitch. An alignment stitch marker

is added at the point where you click.
A Cross is initially used. It is 10mm across. -
Control–click the alignment stitch in the FilmStrip and choose Properties.
-
In the Alignment Stitch properties dialog select your preferred stitch type.
-
Click OK to close the dialog.
-
Add and change any further alignment stitches.
Note: To delete an alignment stitch, select the marker in the work area or FilmStrip, then choose Edit > Delete Object. -
Control–click and choose Finish Alignment Stitches Tool to stop placing alignment stitches.
