Use the headers at the top of the columns in List ![]() view to sort files. For example, click the Name header to place files in alphabetical order, or sort by the date of creation or modification.
view to sort files. For example, click the Name header to place files in alphabetical order, or sort by the date of creation or modification.
-
Click a header in List view. The files are sorted using that header.
Note: To change the headers, Control–click one of the headers and add or remove headers from the context menu.
Search for Embroideries by Name and in the Notes
-
Click the Finder icon
 in the Dock to open it.
 -
In the Show items pop-up menu, choose Column view
 .
. -
Browse to /mySewnet/Samples/Stitch Editor/Stitch.
-
In the Show items pop-up menu, choose Icon view
 . You can now see the .vp4 embroidery files in the Stitch folder as thumbnail pictures.
 -
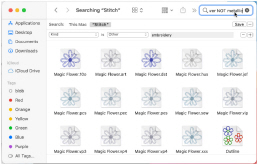
In the Spotlight text box, enter the word: flower
-
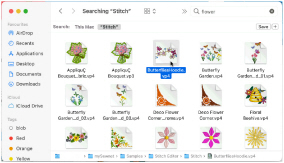
In Search, click "Stitch" to search only the current folder. Thirteen items are found.
-
Many of these embroideries have "flower" in their name, but ButterfliesHoodie.vp4 does not.
Control–click ButterfliesHoodie.vp4 and choose Quick Look in the context menu. -
Scroll down in the Quick Look window. The word "Flowers" is present in the Notes.
-
Close the ButterfliesHoodie Quick Look window.
-
In the Spotlight text box, enter the word ’diamond’. The Raygun2HatBadge embroidery is listed.
-
Control–click the Raygun2HatBadge embroidery and choose Quick Look. In the Quick Look window, scroll down to the Settings. The Settings includes information on the Diamond style used in the Crosshatch fill.
-
Close the Raygun2HatBadge Quick Look window.
-
In the Spotlight text box, enter the word ’flower’ again.
-
To the right of the window in the Search bar, click +. A second search bar appears.
-
In the "Kind" pop-up menu, click Other, and in the Search Attribute list choose Embroidery Notes, and enter ’flowers’ in the text box.
-
Delete the last four letters from ’flowers’ in the second search bar to make ’flo’. Many more embroideries are now displayed, as they had ’floral’ in their Notes, not ’flowers’. You can search on incomplete words, as well as complete words.
Spotlight searches in the embroidery Notes and Settings, as well as for the file and folder name.
Note: A search may produce unexpected results. Check the Notes and Settings, as well as the folder name, to reveal the reason for a surprising result.
Several embroideries are found, all of them use word flowers in their Notes.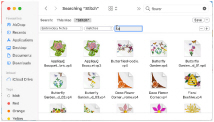
Note: This method of searching looks only at the Notes. It can be used to exclude unexpected results from the name, settings, or folder name. To search for information in the Settings, in the Search Attribute list choose ’Embroidery Settings’ instead of ’Embroidery Notes’.
Note: Use Embroidery Notes and Embroidery Settings as well as other properties such as Embroidery Stitches to search for embroidery information in Spotlight.
Search Types
Use the following search types to search for embroidery properties.
|
Search Term |
Items Searched |
|
Embroidery Notes |
Search within the embroidery Notes. |
|
Embroidery Settings |
Search within the embroidery Settings information. |
|
Embroidery Stitches |
The number of stitches in the embroidery. |
|
Embroidery Colors |
The number of thread colors used in the embroidery |
|
Embroidery Width (mm) |
The width of the embroidery in millimeters. |
|
Embroidery Height (mm) |
The height of the embroidery in millimeters. |
|
Embroidery Width (") |
The width of the embroidery in inches. |
|
Embroidery Height (") |
The height of the embroidery in inches. |
Refining a Search
Use Search to look for files in nested folders, and refine and sort the results to view them.
-
Click the Finder icon
 in the Dock to open it and use Column view
  to browse to /mySewnet/Samples/Finder/Stitch. The folders within the Stitch folder are displayed.
 -
In the Show items pop-up menu, choose Icon view
 .
. -
In the Spotlight text box, enter the word ’flower’, and in Search, click "Stitch" to search only the current folder. There are 47 items in the search results.
-
Look at the list of results. It includes the folder Flowers.
-
To the right of the window, in the Search bar, click +. A second search bar appears.
-
In the pop-up menu on the left, choose Kind.
-
In the pop-up menu on the right, choose Other, and enter "embroidery" in the text box. Only embroidery files are now displayed.
-
Look at the names of the embroidery files. The flowers use varied embroidery file formats.
-
To the right of the window, in the second Search bar, click +. A third search bar appears.
-
In the pop-up menu on the left, choose Name.
-
In the pop-up menu to the right, choose "contains".
-
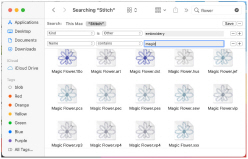
Enter the phrase "vp4" in the text box. Only embroideries in .vp4 format are now displayed.
-
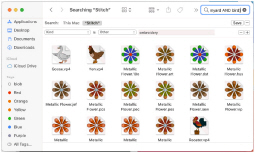
You can also search for part of a file name this way. Enter the word ’magic’. Fourteen embroideries in varying formats are shown.
-
To the right of the window, click - to remove the third search bar.
-
Ensure that the pop-up menu on the left is set to Kind, and on the right to Other, and ’embroidery’ is entered in the text box to display only embroidery files.
-
In the Spotlight text box, enter the phrase:
flower NOT metallic
None of the 28 files displayed have ’metallic’ in their name or notes. -
Enter the phrase: flower AND metallic
-
You can also search using the operator OR. This searches for files and folders using either the word ’flower’ or the word ’metallic’. Enter the phrase: flower OR metallic
-
To perform advanced searches, you can combine searches. Enter the phrase:
(flower AND metallic) OR (farmyard AND bird)
Note: The search results include the contents of the folders within the Stitch folder, and the names of the folders.
Note: If you had performed this search on the whole of your computer, all embroidery files on your Mac would be listed.
You can refine a search in other ways. To exclude all ’flower’ embroideries with the word ’metallic’ in their name or notes, do as follows.
Note: The word NOT excludes any file containing the word that follows it. When used in this way, NOT must use uppercase letters.
All of the 13 files displayed have both of the words ’flower’ and ’metallic’ in their name or notes. AND is a powerful way of narrowing a search.
In addition to the metallic flower embroideries found previously, Goose, Hen and Rooster from the Animals folder are also displayed. Place searches within parentheses to combine them.
Search Operators
Use the following uppercase search operators when searching:
|
Search Operator |
Items Searched |
|
Search for items containing both terms. |
|
|
Search for items containing either term. |
|
|
Search for items that use the first term, but do not use the second. |
Searching for Files by Size and Number of Colors
Use Spotlight to find embroidery files by their size, or the number of stitches.
-
Click the Finder icon
 in the Dock to open it and use Column view
  to browse to /mySewnet/Samples/Finder/Stitch. The folders within the Stitch folder are displayed.
 -
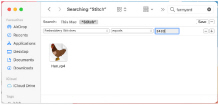
In the Search text box, enter the word ’farmyard’. Nine items are found.
-
In the Show items pop-up menu, choose List view
 .
. -
At the top of the List view, click the Size header. The search results are sorted by file size.
-
In the Show items pop-up menu, choose Icon view
 .
. -
To the right of the window, in the Search bar, click +. A second search bar appears.
-
In the pop-up menu on the left, choose Other, and in the Search Attributes select (check) Embroidery Stitches.
-
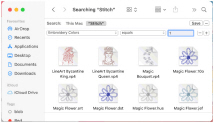
Choose Embroidery Stitches in the menu on the left.
-
In the pop-up menu to the right, choose "equals".
-
In the Embroidery Stitches text box, enter the number ’3433’. The embroidery Hen is found.
-
In the pop-up menu to the right, choose "is less than".
-
In the Embroidery Stitches text box, enter the number ’7000’. If you check with Quick Look, you will see that all of the embroideries listed contain fewer than 7000 stitches.
-
In the pop-up menu to the right, choose "is greater than".
-
As with searching on name and notes, you can combine searches.
-
Set the number back to ’7000’.
-
To the right of the window, in the second Search bar, click +. A third search bar appears.
-
In the pop-up menu on the left, choose Embroidery Stitches.
-
In the pop-up menu to the right, choose "is less than".
-
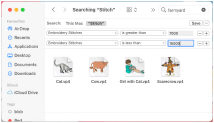
In the lower Embroidery Stitches text box, enter the number ’15000’.
-
If you check with Quick Look, you will see that all of the embroideries listed contain more than 7000 stitches, but fewer than 15,000 stitches.
-
Searching on number of colors is very similar. Delete the text from the Spotlight text box at the top.
-
To the right of the window, click - to remove the third search bar.
-
In the pop-up menu on the left, choose Other, check Embroidery Colors, then select it in the pop-up menu.
-
In the pop-up menu to the right, choose "equals".
-
In the Embroidery Colors text box, enter the number ’1’.
All embroideries in the Stitch folder using only one thread color are displayed.
Note: This is a useful way of searching for Redwork embroideries if you did not add the term to the Notes. -
In the pop-up menu to the right, choose "is greater than".
-
In the Embroidery Colors text box, enter the number 10. All embroideries in the folder with more than ten colors are listed.
This is a very quick way to see the approximate size of embroidery files, but using the stitch count is a better guide.
Note: If the Size header is not there, Control–click one of the headers and add Size from the context menu.
Embroidery Stitches in this form searches on the exact number of stitches. It would be more useful to search within a range.
In the Embroidery Stitches text box, enter the number ’15000’. Only a single embroidery in the Stitch folder with more than 15,000 stitches is displayed.
Similarly if the menu on the right is set to "is less than", all embroideries with fewer than ten colors are shown. If the third search bar is set to Embroidery Colors as well, embroideries with a range of number of colors can be shown (for example, more than five, but fewer than ten).
Searching for Embroideries by Width, Height and Hoop Size
The methods used when searching for embroideries by width and height are the same as those when searching by stitch count and number of colors.
-
Click the Finder icon
 in the Dock to open it and use Column view
  to browse to /mySewnet/Samples/Finder/Stitch. The folders within the Stitch folder are displayed.
 -
In the Spotlight text box, enter the word ’floral’, and in Search click "Stitch" to search only the current folder.
-
To the right of the window, in the Search bar, click +. A second search bar appears.
-
In the pop-up menu on the left, choose Other, and in the Search Attributes select (check) Embroidery Width (mm).
-
Choose Embroidery Width (mm) in the menu on the left.
-
In the pop-up menu on the left, choose Embroidery Width (mm).
-
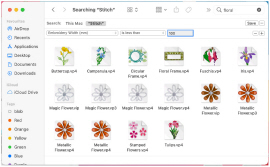
In the pop-up menu to the right, choose "is less than".
-
In the Embroidery Width text box, enter the number: 100
This searches for all embroideries in the folder that are narrower than 100mm. There are 16 such embroideries. -
In the pop-up menu on the left, choose Other, and in the Search Attributes select (check) Embroidery Height (mm).
-
Choose Embroidery Height (mm) in the menu on the left.
-
In the pop-up menu to the right ensure that "is less than" is selected, and that the number is still 100. This time 17 embroideries are found.
-
In the pop-up menu on the left, choose Embroidery Height (mm), in the pop-up menu to the right ensure that "is less than" is selected, and that the number is set to 100.
-
To the right of the window, in the second Search bar, click +. A third search bar appears.
-
In the pop-up menu on the left, choose Embroidery Width (mm).
-
In the pop-up menu to the right, choose "is less than".
-
In the Embroidery Width text box, enter the number: 100. This search displays 16 items.
-
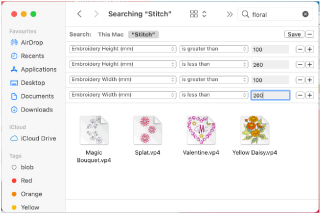
To search for embroideries within a range of hoop sizes, use four search bars. Set one Width and Height to your smallest hoop size, for example 100 x 100, and one to your largest hoop size, for example 260 x 200.
You can combine the two searches to show all embroideries that will fit within a 100mm x 100mm hoop.
Similarly, you could search for any embroideries too big to fit in your largest hoop:
Set Embroidery Width (mm) to greater than 360, and Embroidery Height (mm) to greater than 350.