Use mySewnet™ Convert to create a copy of the embroidery in another embroidery file format, with a different thread range, or with added trims or notes.
Note: mySewnet™ Connect only owners may only convert to .vp3 or .vp4.
Convert an embroidery
-
Control–click an embroidery or embroideries and choose Services > mySewnet™ Convert. Select the desired Output File Type and Output Folder and click OK. The selected embroideries are converted and saved in the selected folder.
Note: If an embroidery file already exists with the same name, a message appears.
Convert a Group of Butterfly Embroideries
-
Click the Finder icon
 in the Dock to open it.
 -
In the Show items pop-up menu, choose Columns view
 .
. -
Browse to /mySewnet/Samples/Finder/Stitch/Animals.
-
In the Show items pop-up menu, choose Icon view
 . You can now see the .vp4 embroidery files in the Animals folder as thumbnail pictures.
 -
Use Command–click to select all of the butterfly designs.
-
Control–click and in the context menu choose Services > mySewnet™ Convert. The Convert dialog opens.
-
In the Output Folder pop-up menu, ensure that the folder is set to /mySewnet/My Designs.
-
Click the Output File Types button. The Export dialog opens.
-
In the File Format pop-up menu, set the file type to Compucon / Singer (.xxx).
-
Click OK, then click OK again in the Convert dialog. Copies of the butterfly embroideries will be created in .xxx format.
-
Browse to the folder /mySewnet/My Designs to view the converted files.
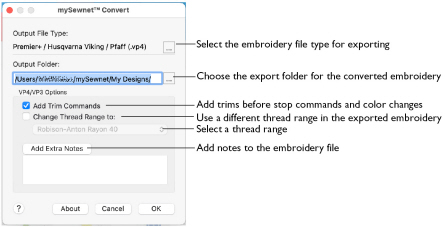
Output File Type
Click the button to view the Export dialog where you can select an embroidery file format for exporting the converted files. See Export.
The preferred file format for exporting embroideries is Husqvarna Viking / Pfaff .vp3, as this will preserve thread color information and notes.
You can also export embroideries as Brother/Baby Lock/Bernina PEC (.pec), Brother/Baby Lock/Bernina PES (.pes), Compucon/Singer PSW (.xxx), Husqvarna (.hus, .shv), Husqvarna Viking /Pfaff (.vp4, .vp3 and .vip), Janome (.jef and .sew), Melco Expanded (.exp), Pfaff (.pcs), Tajima (.dst) or Toyota (.10o).
Output Folder
Select the folder where the converted files should be saved. This is initially set to /mySewnet/My Designs.
VP4/VP3 Options
Add Trim Commands
Use the Add Trim Commands function to add Trim commands before most movement stitches in the selected embroideries.
Note: Trim commands are added before movement stitches using the same criteria as for mySewnet™ Stitch Editor. If an embroidery with added Trim commands does not display as desired, open it in mySewnet™ Stitch Editor and use Insert Trim ![]() on the Modify page of the control panel to add individual Trim commands as desired.
on the Modify page of the control panel to add individual Trim commands as desired.
Change Thread Range
Use ’Change Thread Range to’ to convert the colors in an embroidery to a chosen thread range, including a My Thread range. Any selected embroideries are converted.
-
Choose a thread range from the Change Thread Range pop-up menu, and click OK to change the thread range.
Note: In other mySewnet™ Embroidery Software apps you can use Thread Range in the Color Tone dialog to change the thread range for an embroidery without adjusting other settings.
Use Change Thread Range to convert embroideries to any of the thread ranges available in the mySewnet™ Embroidery Software. For instance, you may convert embroideries to a My Thread range, to see which threads to use from your personal thread collection.
Add Extra Notes
Click Add Extra Notes to open the Notes dialog. See Notes.
Note: This is only available when converting to .vp4 or .vp3 embroidery file format.