Finder Integration & Spotlight
Use Finder and Spotlight to view your embroideries and their details.
When mySewnet™ Embroidery Software is installed, it is integrated with the Finder so that embroidery files can be viewed as icons, and the Spotlight search feature can be used on embroideries, and embroidery details.
-
Open embroidery designs in mySewnet™ Embroidery or mySewnet™ Stitch Editor.
-
Open design outline files (.edo) in mySewnet™ Digitizing.
-
Open cross stitch design files (.krz) in mySewnet™ Cross Stitcher.
Note: Embroidery design outline (.edo) files appear in the Finder with a colored representation of the filled areas.
Note: Melco (.exp) embroidery files cannot be seen in the Finder. Use Insert to open them.
|
To learn how to |
Go to |
|---|---|
|
View the details for an embroidery in the Finder. |
|
|
View the design information in the Quick Look window for the file. |
|
|
Search for embroidery designs using Spotlight. |
|
|
Create a copy of the selected embroideries in another embroidery file format, with a different thread range, or with added trims or notes. |
|
|
Send the selected embroidery to the mySewnet™ cloud for your mySewnet™ enabled embroidery machine. |
View Embroideries in the Finder
-
Click the Finder icon
 in the Dock to open it.
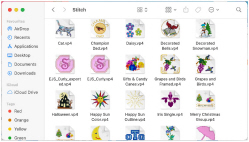
-
In the Finder, choose Go > Home, or press ⇧⌘H.
-
In the Show items pop-up menu, choose Columns view
 .
. -
Browse to mySewnet/Samples/Embroidery/Stitch.
-
In the Show items pop-up menu, choose Icons
 .
. -
Choose Column view
 again, and click Biplane. The vintage plane design is shown on the right.
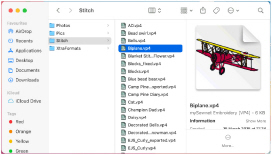
-
In the Show items pop-up menu, choose Gallery view
 (the fourth option). Click on the biplane design. You can now swipe to view the other designs.
 -
Return to Icon view
 .
. -
Select Grapes and Birds.vp4.
-
Control–click and choose Quick Look.
-
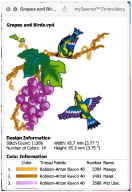
Control–click Grapes and Birds.vp4 again and choose Get Info.
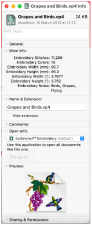
Some information on the embroidery appears, including the date modified, number of colors, stitches, the dimensions and Notes.
Note: From the Open With option on the pop-up menu you can choose to open the embroidery in mySewnet™ Embroidery or mySewnet™ Stitch Editor. You can also choose Open With from the Quick Look or Get Info windows.
If desired, use the Get Info window to choose an application to open all embroidery files (for example, mySewnet™ Stitch Editor), so that when you double-click on a file it opens in your chosen application. -
Open the Preview. A picture of the design appears.
-
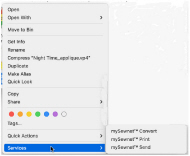
Control–click Grapes and Birds.vp4 again and choose Services.
-
Use mySewnet™ Send to send the embroidery to your computer, or to your mySewnet™ enabled embroidery machine.
-
Use mySewnet™ Print to print the worksheet for the embroidery, using the settings selected in mySewnet™ Embroidery.
-
Use mySewnet™ Convert to create a copy of the embroidery in another embroidery format, with a different thread range, or with added trims or notes.
Note: mySewnet™ Connect only owners may only convert to .vp3 or .vp4.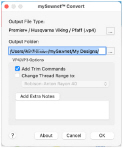
-
Close the Grapes and Birds.vp4 Info window, then click Column view
 .
. -
Browse to /mySewnet/Samples/. This folder contains pictures and embroidery files.
-
In the Spotlight
 text box, enter a keyword to search, for example, "Rose".
 -
Click Icon view
 .
. -
The search has been made on the whole computer, and any file with the word "rose" in it is listed. In Search, select "Samples".
You can now see thumbnail pictures for embroidery (.vp4 and .edo) and picture (.jpg) files. -
To the right of the window, click +. A second search bar appears.
-
In the pop-up menu on the left, choose Kind, and in the pop-up menu on the right choose Other. Then enter "embroidery" in the text box. Only embroidery files are now displayed.
-
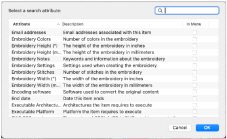
Click the pop-up menu on the left and choose Other. A list of attributes to search on appears.
You can choose embroidery features, for example number of colors, in these pop-up menus. -
Scroll down to "Embroidery" to see the details you can search for.
-
Click Cancel.
You can construct very complex searches using these features. -
To the right of the window, click Save.
-
Give your search a name and save it. Use this feature to save a search for embroideries to the sidebar, for easy access.
-
To the right of the window, click +. A third search bar appears. You can use this to check for last used time.
-
Close the Finder window to finish searching.
You can now see the .vp4 embroidery files in the folder as thumbnail pictures.
The embroidery worksheet appears, showing a picture of the embroidery, the color blocks used, the stitch count, the number of colors, the dimensions, and the Notes.
Note: If you had performed this search on the whole of your computer, all embroidery files on your Mac would be listed.