Use Reset File Associations  to reset the file associations for embroidery files and embroidery design files.
Note: This may be required if other embroidery software is installed after the mySewnet™ Embroidery Software.
Resetting File Associations
-
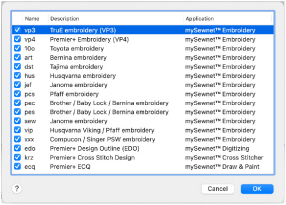
In the Utilities tab of mySewnet™ Configure, click Reset File Associations
 .
. -
Select (check) the file types that you want to associate with your mySewnet™ Embroidery Software.
-
Click OK to reset the file associations for those file types.
If you click one of these file types to open it, it should now be opened by your mySewnet™ Embroidery Software.
Add Your mySewnet™ Embroidery Software Apps to the Dock
-
Click the mySewnet™ Embroidery icon in the Launchpad
 or Finder
  to start mySewnet™ Embroidery.
 -
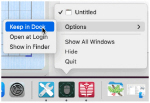
Control–click the mySewnet™ Embroidery icon in the Dock.
-
Choose Options > Keep in Dock. You can now open mySewnet™ Embroidery at any time from the Dock.
-
Click the mySewnet™ Thread Cache icon in the Launchpad
 or Finder
  to start mySewnet™ Thread Cache.
 -
Control–click the mySewnet™ Thread Cache icon in the Dock and choose Options > Keep in Dock.
-
Click the mySewnet™ Configure icon in the Launchpad
 or Finder
  to start mySewnet™ Configure, then Control–click the mySewnet™ Configure icon in the Dock and choose Options > Keep in Dock. (If TruEmbroidery™ 3 Elements or Premier+™ EXTRA are owned, all of your mySewnet™ Embroidery Software apps can now be easily accessed from the Dock.)
 -
If available, click the mySewnet™ Digitizing icon in the Launchpad
 or Finder
  to start mySewnet™ Digitizing, then Control–click the mySewnet™ Digitizing icon in the Dock and choose Options > Keep in Dock.
 -
If available, click the mySewnet™ Stitch Editor icon in the Launchpad
 or Finder
  to start mySewnet™ Stitch Editor, then Control–click the mySewnet™ Stitch Editor icon in the Dock and choose Options > Keep in Dock.
 -
If available, click the mySewnet™ Cross Stitcher icon in the Launchpad
 or Finder
  to start mySewnet™ Cross Stitcher, then Control–click the mySewnet™ Cross Stitcher icon in the Dock and choose Options > Keep in Dock. (If your subscription covers the full system, all of your mySewnet™ Embroidery Software apps can now be easily accessed from the Dock.)
Note: If you only own mySewnet™ Connect, open mySewnet™ QuickFont in the Launchpad ![]() or Finder
or Finder ![]() , then Control–click the mySewnet™ QuickFont icon in the Dock and choose Options > Keep in Dock. (If other mySewnet™ or Premier+™ software is owned, you can use the QuickFont Assistant button in the Configure Utilities tab, or in the Letter window in Embroidery.)
, then Control–click the mySewnet™ QuickFont icon in the Dock and choose Options > Keep in Dock. (If other mySewnet™ or Premier+™ software is owned, you can use the QuickFont Assistant button in the Configure Utilities tab, or in the Letter window in Embroidery.)