Use Freehand Appliqué Hole  to draw a line of any shape to create a hole within the selected appliqué area.
To create a hole in an appliqué area with Freehand Appliqué Hole
-
In the Appliqué window, select an appliqué piece, click Freehand Appliqué Hole
 , then drag to draw a line to form the hole.
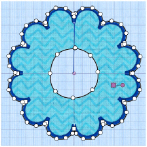
Draw a Hole in an Appliqué Area
-
Open the Border

window of the Control Panel

.
-
In the Appliqué section, click Add Appliqué

.
-
Select the fabric of your choice, then use Border Shape

to draw an external border

-
Open the Appliqué window

of the Control Panel

.
-
Select Freehand Appliqué Hole

.
-
Drag to draw a circle in the middle of your appliqué area.
-
Control–click and choose Finish Appliqué Hole to create the hole.
Note: Hold down Command to place a corner point when adjusting a line defining a hole.