Use Add Appliqué  to add appliqué to the border that you create. Appliqué placement stitches are automatically added to the border that you draw.
Add Appliqué to a Border
-
Select Add Appliqué
 , and draw the desired border shape with one of the Draw Border Line tools. Change the shape as desired, then use the desired Create Border function.
A new color block, using the same color as the border is placed at the beginning of the embroidery for the appliqué placement stitches. The appliqué placement stitches use the method, appliqué piece margin, running stitch length and double stitch length set in Appliqué Options. A Color Change is also placed at the beginning of the border line, using the default border color. The border uses the stitch type settings set in the Line Options for the selected stitch type.
|
|
|
|||
|
|
|
|
|
|
|
Create External Border |
|
Create Internal Border |
|
Create Overlay Border |


 with appliqué removes the stitches outside the shape that was drawn. It then adds appliqué placement stitches at the beginning of the embroidery and a border around the stitches.
 with appliqué removes the stitches inside the shape that was drawn. It then adds appliqué placement stitches at the beginning of the embroidery and a border inside the stitches.
 with appliqué keeps all the stitches in the embroidery. It then adds appliqué placement stitches at the beginning of the embroidery and a satin border on top of the embroidery.
Draw Internal Heart Appliqué
-
If required, choose File > New.
-
Click Hoop
 and from the Universal Hoop Group, set the Hoop Size to 240mm x 150mm - Universal Large Hoop 2. Set the Orientation to Rotated. Click OK.
 -
Choose Edit > Insert > Insert Design and in the folder mySewnet/Samples/Stitch Editor/Stitch load the 'Lace Heart' embroidery.
-
Choose mySewnet Stitch Editor > Preferences. In the General window, ensure Grid Size is 5mm and click Close to close the dialog.
-
Choose View > Grid > Grid Numbered Full. This is so there are grid numbers along the right and lower sides of the stitch area.
-
Select the Border
 window of the Control Panel
  .
. -
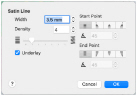
In Stitch Type select Satin Line

.
-
In the Stitch Type area, click the Options button.
-
In the Satin Line dialog, set the Width to 3.5mm and the Density to 4.
-
Ensure Underlay is selected (checked) and click OK.
-
In the Appliqué section, click Add Appliqué
 , then click Options.
 -
In the Appliqué Options dialog, in Appliqué Method ensure that the first method (Standard Appliqué) is selected.
-
Ensure Running Stitch Length is set to 2.0mm and Double Stitch Length is set to 2.0mm.
-
Click OK to close the Appliqué Options dialog.
-
Select the Design
 window of the Control Panel
  .
. -
In the color worksheet, click the check box for the first thread color to hide the stitches of the lace.
-
Click the Border
 window of the Control Panel
  .
. -
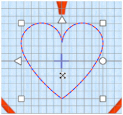
In the Shape pop-up menu, choose shape 71, the first heart shape. If necessary, use the scroll bar at the side of the list to find the shape.
-
Hold down the Shift key to force the shape to be proportional.
-
Drag diagonally across the hoop to draw a box from left grid line 6 to right grid line 6, so that the box is 12 grid squares wide, then release the mouse button. The heart shape is shown on the work area in a selection box.
-
Drag inside the small heart shape and move it to the center of the hoop. The shape is centered when the points of the flip handles are on the center grid lines.
-
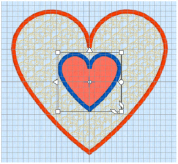
Create Internal Border
 . The lace stitches in the central part of the embroidery are replaced by an appliqué area.
 -
Select the Design
 window of the Control Panel.
 -
In the Design Select area there are two subdesigns: a heart with an internal and external border, and a lace heart with no border. Select the lace heart and click Select All Visible
 , then choose Edit > Delete to remove this lace heart.
 -
The first and last colors in the embroidery should match the red for the external border. Select the first color.
Note: These are the appliqué placement stitches. -
Change the thread color to Sulky Rayon 40 thread number 1246 (Orange Flame).
-
Select the final color (the internal border) and change the thread color to Sulky Rayon 40 thread number 1246 (Orange Flame). The heart internal border is now red.
-
Save the embroidery as Internal Lace Heart.vp4.