Word Sculpt Assistant Examples
Create a Running Man Word Sculpt Design
-
If required, choose File > New.
-

of the Control Panel

click Word Sculpt Assistant

.
 The Select Outline page of the Word Sculpt Assistant appears.
Note: A large hoop is best when creating a word sculpture. -
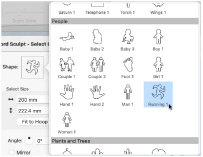
Click the Shape button to view the Shape list. There are over 300 shapes to select from.
You can also load, create or edit a shape. -
In the Shape pop-up list scroll down to the People category, and select the shape Running 1.
Note: The size of the design is set by the currently selected hoop. There is no need to change the settings in Select Size for this design. -
Ensure that Angle is set to 0, and that Mirror is not selected.
Note: Use Angle and Mirror to adjust the position of the outline. -
In Stitch Type ensure that Satin Line
 is selected.
Note: For a different effect, you could choose Motif Line , and click Options to select a different motif and its settings.
-
Click Continue and the Select Words page of the assistant appears.
-
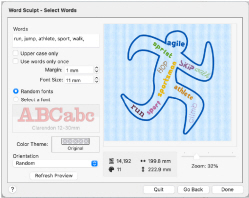
In the Words text box, enter the words or phrases to use in your design, separated by a comma. You may find it easier to create the list in a text editor and paste it in.
Note: Not all of your words may be used. Enter a word twice in your list if you want it to be frequent in the design. -
Deselect Upper case only to use upper and lower case letters.
-
If desired, select Use words once only if you do not want words repeated.
-
Set Margin to 1mm to place the words close to each other.
-
Reduce Font Size to 8mm to enable more words to fit into the running man outline.
-
Ensure that Random fonts is selected.
-
Click the Color Theme button and ensure that Original is selected in the pop-up menu. The outline and words will use their original colors.
-
In Orientation ensure that Random is selected.
-
Click the Refresh Preview button to use your updated settings.
-
Click Refresh Preview again. The arrangement of the words and the number of words used changes.
-
Change the settings and use Refresh Preview until you are happy with the results.
-
Click Done to place the design in the work area. Save this original version, if desired.
Note: The design is loaded as a Group, and each word is a lettering Block with Curve line types at Top and Bottom, and Constraint set to Free. You can mould each Block to almost any shape you wish.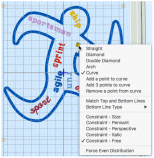
-
At the bottom of the FilmStrip, click Reveal Groups
 , then click the yellow handle on one of the lettering Blocks. You can see the settings for the Block.
Note: For more information on adjusting lettering Blocks, see Creating Lettering in the mySewnet™ Embroidery Reference Guide or Help. -
Drag the handles on the block to mold it to the desired shape.
Note: Choose Edit > Previous Design (⌘←) and Edit > Next Design (⌘→) to move between the designs in the Group. -
To change the font in a lettering Block, Control–click the Block and select Properties in the Context menu.
Note: If you want to mould a lettering Block to a larger size, a different font may look better. Search by Size to find a font in a suitable size range.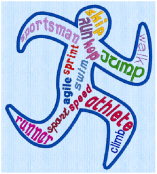
-
To add a word to the design, choose Edit > Copy (⌘C) then Edit > Paste (⌘P) to copy and paste one of the words, and then move it to the desired position.
-
Control–click the new word, and in the Letter Properties dialog change the text and font. Click OK.
-
In the Color Select area on the Design Panel, click the thread color and set it to match the theme.
-
Add words to your design and mold them to shape, then Save your finished design.
Note: Random fonts uses a variety of fonts recommended for the selected Font Size. For example, both Antonia 10-20mm and Arial 08-14mm may be used if the Font Size is set to 11mm.
Note: Use one of the other Color Themes to set the design to variants of the same color.
For a different effect, you could select Horizontal and Vertical or one of the other options.