Using and Adjusting Decorations
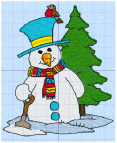
Sequin Snow
-
Click Hoop

in the toolbar, and in the Hoop Selection dialog select 170mm x 100mm - Universal Midsize Hoop 1.
-
Set Orientation to Natural and click OK.
-
Choose File > Insert.
-
Browse to mySewnet/Samples/Embroidery/Stitch.
-
Scroll down until you see "Snowman".
-
Click Open to load the embroidery into the work area.
-
In the Category section of the Embellish window
 , select Decoration
  .
. -
In the Embellish window
 of the Control Panel
  , click Place Individual
. The Decoration Selection dialog appears.
-
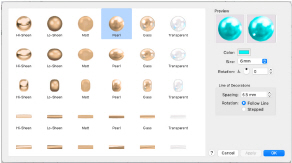
At the top, select the Pearl Round decoration.
-
Click Color, and in the Colors window select the Colored Pencils, then click the turquoise pencil.
-
In the Size pop-up menu, select 6.0mm.
-
In Rotation, ensure that angle is set to zero.
Note: The settings for Line are not relevant as you will place beads individually. -
Click OK to select the turquoise round bead, and close the Decoration Selection dialog.
-
Click in the center of the lower button on the snowman’s coat. A large bead is placed for the button.
-
Click to place a bead on the top button.
-
When you have placed the two beads, click Place Individual

. The Decoration Selection dialog appears again.

-
Scroll down to the Nailhead Teardrop decorations and select Hi-Sheen Nailhead Teardrop
 .
. -
Click Color, and in the Colors window select the Colored Pencils, then click the Moss color pencil.
-
In the Size pop-up menu, choose 4.0mm.
-
Click OK to close the Decoration Selection dialog.
-
Click to place several green teardrops on the tree, like melting snow.
-
Click Place Individual

to open the Decoration Selection dialog again.
-
Scroll up to the Sequin Snowflake decorations, and select Hi-Sheen Sequin Snowflake
 .
. -
Click Color, and in the Colors window select the Colored Pencils, then click the Snow (white) pencil.
-
In the Size pop-up menu, select 6.0mm, and click OK to close the Decoration Selection dialog.
-
Click to place snowflakes around and above the snowman.
-
Control–click when you have placed the snowflakes and select "Finish Placing Individual" from the Context menu.
-
Click outside the embroidery and decorations. There is no selection box.
-
Click on the snowman. The snowman embroidery is surrounded by a box with white handles. This is the selection box for the embroidery.
-
Click on one of the snowflakes above the snowman.
-
The decorations are surrounded by their own selection box with green handles. This shows the current decoration subdesign.
Note: If you deselected Place Individual and started again, you may have two or more decoration subdesigns. -
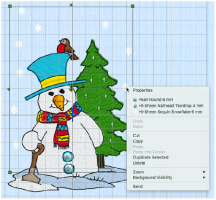
Control–click the decoration subdesign. A Context menu appears.
-
Select Hi-Sheen Nailhead Teardrop in the Context menu.
The Decoration Selection dialog appears, with this decoration type selected. -
Click the Hi-Sheen Nailhead Star above the teardrop, then click OK to close the dialog.
All of the teardrops have been replaced by stars.
Note: You could also change the decorations using Edit Points and Properties, but you would have to use Command to Multiple Select the individual teardrops. The Context menu is a quick way to change all of a specific type of decoration in the subdesign. -
Control–click the decoration subdesign and in the Context menu, choose "Undo Modify decoration properties". The teardrops return.
-
Choose File > Save and in the Save As dialog, save the snowman as Decorated Snowman.
The snowman embroidery and the decoration subdesign are saved as the .vp4 file Decorated Snowman.
Note: When you next open the file the decorations will be present. -
Click Life View

to see the embroidery and decorations without a grid or hoop.
Note: Place the pointer over the decorations to see the names. The other Round bead materials are Hi-Sheen, Lo-Sheen, Matt, Glass and Transparent.
Note: The pointer changes to the Insert pointer

to show that you may place decorations.
Note: If you place a bead in the wrong position, Control–click and select "Undo Add single decoration" to remove the last decoration in the current sequence.
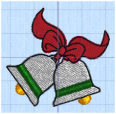
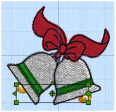
Decorated Bells
-
Click Hoop

in the toolbar, and in the Hoop Selection dialog select 100mm x 100mm - Universal Square Hoop 1 and click OK.
-
Choose File > Insert.
-
Browse to mySewnet/Samples/Embroidery/Stitch and select the embroidery ’Bells’.
-
Click Open to load the embroidery into the work area.
-
Click outside the embroidery so it is not selected.
-
In the Category section of the Embellish window
 , select Decoration
  .
. -
Click Place Individual

. The Decoration Selection dialog appears.
-
In the third row, select the Pearl Seed decoration.
-
Click Color, and in the Colors window select the Colored Pencils, then click the Cantaloupe (orange) color pencil.
-
Close the Colors window.
-
In the Size pop-up menu, select 3.0mm, and ensure that the angle is set to 0.
-
Click OK to select the pearl seed bead, and the Decoration Selection dialog will close.
Note: The pointer changes to the Insert pointer
to show that you may place decorations.
-
Click on top of the clapper in the bell on the left. A seed bead is placed over the gold clapper.
-
Click on the clapper for the bell on the right to place a bead there as well.
-
Control–click when you have placed the beads and select "Finish Placing Individual" from the Context menu.
The two individually placed beads form a subdesign in the work area. -
Click outside the subdesign.
-
Click Draw Freehand Line
 . The Decoration Selection dialog appears.
 -
Scroll down and select the Glass Nailhead Rectangular
 decoration.
 -
Click Color, and in the Colors window select the Colored Pencils, then click the Spring (green) color pencil.
-
Close the Colors window.
-
In the Size pop-up menu, select 3.0mm.
-
Set Spacing in Line of Decorations to 3.0mm, and ensure that Follow Line is selected.
-
Click OK to close the Decoration Selection dialog. The pointer is the pen pointer

.
-
Draw a line along the green ribbon of the bell on the left.

-
Click Draw Point Line
 . The Decoration Selection dialog appears.
 -
You will use the same beads for the second ribbon as for the first, so click OK to close the dialog. The pointer is the Point pointer

.
-
Click three points in a line along the green ribbon of the bell on the right, then Control–click and choose "Finish Drawing Line" to finish the line.
Another line of green rectangular beads appears. -
Click outside the embroidery and decorations.
-
Click the Shape pop-up menu and choose shape 1, a circle, in the list.
-
Click Place Shape

. The Decoration Selection dialog appears.
-
In the third row, select the Hi-Sheen Seed decoration.
-
Click Color, and in the Colors window select the Colored Pencils, then click the Cantaloupe (orange) color pencil. Close the Colors window.
-
In the Size pop-up menu, select 2.0mm.
-
Set Spacing in Line of Decorations to 2.0mm, and ensure that Follow Line is selected.
-
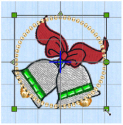
Click OK to close the Decoration Selection dialog. The circle design is shown in a selection box with green handles.
-
Hold the Shift and Option keys, then drag one of the corner handles to enlarge the circle of beads proportionally and from the center so that it will fit around the design.
-
Move the pointer over the circle. The pointer changes to the move pointer

.
-
Drag the circle of beads so that it fits neatly around the embroidery.
-
Press Command and the left arrow slowly several times. The selection boxes for the embroidery and the other decoration subdesigns are shown in turn.

-
With the bead circle highlighted, Control–click. The Hi-Sheen Seed beads are listed in the Context menu.
Note: The Context menu only shows the decorations within the selected subdesign. -
Choose File > Save and in the Save As dialog, save the bells as Decorated Bells.
The bells embroidery and the decoration subdesigns are saved as the .vp4 file Decorated Bells.
Note: When you next open the file the decorations will be present. -
Click Life View

to see the embroidery and decorations without a grid or hoop.
You could display the design on a fabric with the Background Assistant. See Background Assistant.
Note: If desired, use Edit Points  to select the ribbon lines for adjustment. See Edit Points.
Note: This will start a new decoration subdesign.
Edit a Bead Crescent
Note: This exercise uses items from the full set of Backgrounds. See Backgrounds.
-
Click Hoop

in the toolbar, and in the Hoop Selection dialog select 260mm x 200mm - Universal Large Hoop 3, set Orientation to Rotated, and click OK.
-
Click the Load Background
 button on the toolbar. The Background Assistant opens.
 -
Select Load Previously Saved and click Continue.
-
Click the Select button.
-
In Garments choose Bags & Hats, Mini Reporter Bags, Mini Reporter Bag Red_Dk as your background.
-
Click OK, then click Done to close the Assistant.
-
In the Category section of the Embellish window
 , select Decoration
  .
. -
Click the displayed shape, and select the crescent shape (31) from the pop-up menu.
-
Click Place Shape

. The Decoration Selection dialog appears.
-
Scroll down and select the Hi-Sheen Seed
 bead, using the Tangerine color in the Colored Pencils, 3mm in size, with a spacing of 3.5mm.
 -
In Line of Decorations, select (check) Follow Line.
-
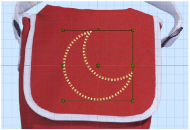
Click OK to close the Decoration Selection dialog. The crescent design is shown on the work area in a selection box with green handles.
-
Hold the Shift key, then drag one of the corner handles to enlarge the crescent to suit the size of the front of the bag.
Note: Hold Shift to retain the original proportions.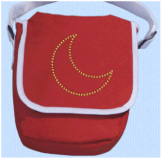
-
Move the pointer over the crescent. The pointer changes to the move pointer

.
-
Drag the crescent to the desired position.
The beads at the point at the top overlap. The design can be adjusted to prevent this. -
Click Edit Points
 , then click the crescent. The shape is shown as a curved line with points showing the curve, and with each decoration in its own box.
 -
Click the square point at the top of the crescent.

-
Drag to move this point slightly upwards. The shape becomes a line with two ends.
Note: All of the decoration shapes are closed lines (a line where the two ends are closed to form a shape). -
Click Delete Points

.
-
Move the pointer towards the point that you dragged.
Note: As the pointer approaches the point it becomes the minus pointer
.
-
Click the point. That point, and the beads between it and the next point are removed.
Note: Use Delete Points to remove some of the points defining a line of decorations. You can use Insert Points to add points to a line.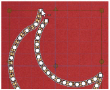
-
There is still a one bead overlap. It would be better to adjust this bead than to delete the whole of the next section.
Control–click and in the Context menu select "Finish Deleting Points". -
Drag the end point so that the beads no longer overlap.
-
Click outside the shape to view the beads. There is now a gap where the two ends of the line meet.
Note: This gap could be minimized if you could change the position of the beads individually. -
Click the line of beads so that it is selected.
-
Use Edit > Undo until you can see the original shape again.
-
Click Break Up Line

. Every bead is now an individual decoration, forming part of a subdesign.
Note: While the whole subdesign is still selected it can be moved as one unit. -
Click outside the selection box, then click one of the overlapping beads.
Note: The beads can now be moved or deleted independently.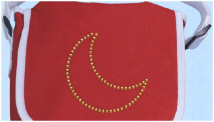
-
Click Delete Selection

. The bead is removed from the work area.
-
Delete and move beads until you have a smooth line.
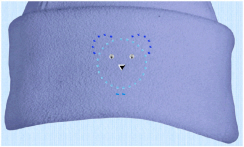
Bear on Beanie Hat
Note: This exercise uses items from the full set of Backgrounds. See Backgrounds.
-
Click Hoop

in the toolbar, and in the Hoop Selection dialog select 260mm x 200mm - Universal Large Hoop 3, set Orientation to Rotated, and click OK.
-
Click the Load Background
 button on the toolbar. The Background Assistant opens.
 -
Select Load Previously Saved Background and click Continue.
-
Click Select, and in Garments select Bags & Hats\Beanie Hats\Medium\Beanie Hat 1 Med Gold as your background. Click Done to load the hat.
-
If needed, use the Zoom slider to zoom out, and use Move and Rotate Background

to drag the brim of the hat to the center of the screen.
-
In the Category section of the Embellish window
 , select Decoration
  .
. -
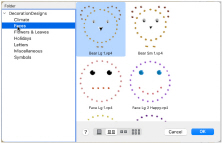
Click Insert from Gallery
 , and in DecorationDesigns\Faces select Bear Lg 1.
 -
Click OK to place the bear design in the work area.
-
In the toolbar, click Realistic View Mode

. The bear design can be seen on the brim of the hat.
The brown crystals and sequins go well with this gold colored hat, but what if the hat was blue?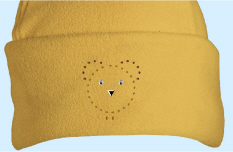
-
Click the Load Background
 button on the toolbar and in the Background Assistant select Load Previously Saved and click Continue.
 -
In Garments select Bags & Hats\Beanie Hat\Medium\Beanie Hat 1 Med Blue_Lt.
-
Use Move and Rotate Background

to drag the brim of the hat to the center of the screen.
-
Control–click and select Finish moving and rotating background.
-
Use the Zoom Slider to zoom in on the Decoration Gallery design.
-
Click to select, then Control–click the design. Near the top of the Context menu several decoration types are listed.
-
A medium brown round crystal is used for the outline of the bear’s head. Choose Matt Crystal Round 3 mm at the top of the Context menu. The Decoration Selection dialog opens.
-
Click Color, and in the Color Pencils select the pale blue, Sky, then click OK. The outline of the bear’s head is now blue.
-
Control–click the design again, and select Matt Crystal Rectangular 4 mm. These crystals form the bear’s neck.
-
Change these beads to the medium blue, Aqua, in the Colored Pencils, then click OK.
-
Control–click again and select the dark brown Matt Crystal Round 3 mm decorations.
-
Change these to the deep blue, Blueberry, in the Colored Pencils, then click OK.
The colors of the other decorations will go well with the blue hat. -
Zoom out to view the hat.
-
You can change individual elements of the Decoration Gallery design. Click 3D View

.
-
Open the Embellish window
 in the Control Panel
.
-
Click Edit Points
 , then click the outline of the bear’s head. This is a line of beads.
 -
Click one of the beads in the bear’s ears. These are individual beads.
Decoration Gallery designs are a single subdesign containing lines of decorations and individual decorations. Adjust decorations using Edit Points  and the Properties button or the Context menu.