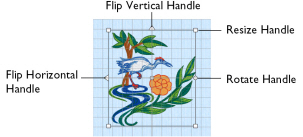
In all windows except the Modify window, the currently selected embroidery is shown with a selection box around it. The selection box has square resize handles on the corners, triangular flip handles on the top and left, and a circular rotate handle on the right.
The handles are blue if in resize mode (density retained when resized), white in scale mode (stitch count retained when resized), and green for lettering, .edo designs, SuperDesigns and frames before they are fixed as embroideries, and in Encore.
Note: If a selection box has round handles on its corners, part of it is outside the selected hoop. Move it into the hoop, or change the hoop size.
If no design is selected, no selection box is visible and the Color Select area in the Design window is blank.
Note: Each of the selected embroideries may be rotated, mirrored or resized individually.
To Select an Embroidery
-
Click the embroidery in the work area or FilmStrip.
-
Press the Command and the left or right arrow keys to select each embroidery in turn.
-
Choose Edit > Previous Design (⌘←).
-
Choose Edit > Next Design (⌘→).
When making a selection, only embroideries that are completely enclosed by the selection line (Box, Point or Freehand Line) will be included.
Note: After embroideries have been combined, there is only one embroidery, so it will no longer be possible to select the individual parts in this way. Use Group to keep multiple embroideries, lettering and SuperDesigns together while retaining the ability to edit tem individually. To select items within a group, use Restrict Group. Alternatively, use the Modify window to select and adjust the desired part of an embroidery. Individual stitches and blocks may always be adjusted in the Modify window. See Select Stitches.
The Context Menu and Individual Designs
Use the Context menu to access editing functions for individual designs, such as size and rotation.
You can also change the properties for stitch types in lettering (in addition to font characters, Lettering Shape and so on), frames and SuperDesigns, or fix them as stitches.

Adjust the appliqué fabric and margin for lettering, Frames and SuperDesigns, and decorations for an embroidery. See Appliqué Selection and Decoration Selection.
Note: Use the context menu to adjust these properties if the Embellish tab is not available.
To adjust the properties for an individual design within a group, click Reveal Groups ![]() below the FilmStrip or in the context menu, then select the desired item.
below the FilmStrip or in the context menu, then select the desired item.
To access the context menu
-
Control–click the design, and select the desired function from the context menu.