Use Select Fabric  to audition a fabric for the selected appliqué piece in the Appliqué Selection dialog.
To change the fabric for an appliqué piece
-
In the Appliqué window, select the desired appliqué piece, then click Select Fabric
 and change the fabric in the Appliqué Selection dialog. See Appliqué Selection.
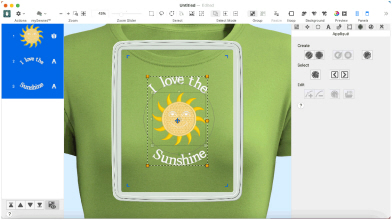
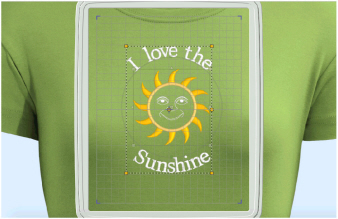
Place Points to Add Appliqué to a Sun Embroidery
Note: This exercise uses items from the full set of Backgrounds. See Backgrounds.
-
Choose File > Open to open an existing embroidery.
-
Browse to the folder mySewnet/Samples/Embroidery/Stitch and load the embroidery 'Sunshine Applique Large with Lettering'.
-
Choose File > Duplicate to open a copy of this embroidery.
-
Click the Load Background
 button on the toolbar. The Background Assistant opens.
 -
Select Load Previously Saved and click Continue.
-
Click Select, and load Garments/Ladies/T-Shirts Round Neck/Medium/T-shirt 1 Med Green_Lt.
-
Use Move and Rotate Background

to move the T-shirt downwards.
-
Open the Appliqué window
 of the Control Panel
  .
. -
Click Zoom To Rectangle

, then drag to zoom in on the sun’s face.
-
Click Point Appliqué Outline

.
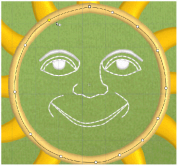
Note: Appliqué is added by placing a series of points to mark the edge of the area where you want to show the appliqué fabric. -
Click to select the color command

to the left of the grid line. As you hover over it, the stitches of the satin ring are highlighted. This will be a good location for the fabric.
Note: The red markers are Stop Command markers
, and the blue markers are Color Change

markers.
-
Click to place the first point of the area at the top point of the sun’s face on the sun outline. A yellow round node appears, and the pointer changes to the Point pointer

.
-
Click to place a second point, down and to the right of the first point, following the satin line around the sun’s face.
As you place points a line is drawn. Make sure that this line is on the satin line, as this marks where the edge of your appliqué will be. -
Click to place a third point further around the circle. As you place more points the line adjusts itself.
-
Move the pointer over one of the nodes on the line. The pointer changes to the Move Node pointer

. Adjust the node as desired.
When the Move Node pointer is active you can adjust existing nodes.
Note: If you click while the Point pointer
is active, another point will be added to the line.
-
Place points to complete the circle.
-
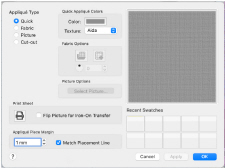
Control–click and choose Finish Point Line. The Appliqué Selection dialog appears, so you can choose a fabric for your appliqué.
-
In Appliqué Type, click Fabric.
-
Click Load Previously Saved Fabric

to load a fabric in the Viewer.
-
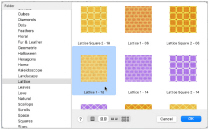
Browse to the folder General\Lattice.
-
Click the fabric Lattice 1 - 18, then click OK. The Viewer will close and the fabric will be shown in the Appliqué Selection dialog.
-
Click OK to close the Appliqué Selection dialog. The fabric is shown under the sun’s face, as if you had stitched it down as an appliqué.
If the fabric is on top of the embroidery, the wrong command marker, or the wrong embroidery was selected. Undo the appliqué and try again. -
Click Zoom To Fit

.
-
In the toolbar, click Life View

.

-
Move the Zoom Bar slider to the left so that you can see the t-shirt as well as the embroidery.
Note that the threads for the sun’s face and lettering are white. -
Click Solar Reactive

. The white threads turn yellow and orange.
-
Choose File > Save and save the embroidery with the appliqué and background as ’Sunshine Applique Large with Lettering and Background’.
Note: The sun and lettering will be stored separately within this multipart embroidery, making further adjustment easier.
Note: The embroidery is loaded as a multiple selection with the hoop included. If you used Insert, the initial hoop would be retained, but the embroideries are inserted as a group.
Note: This ensures that you do not overwrite your original.
Note: The line may ’swing’ while you place points. Just carry on, you can adjust it afterwards. You can use Shift and click to place square nodes for straight lines.
Note: If you made a mistake while placing the appliqué line, click Cancel in the Appliqué Selection dialog without choosing a fabric and start again.