Use Place Individual  to place decorations individually on your project.
To place a decoration with Place Individual
-
In the Category section of the Embellish window
 , select Decoration
  , then click Place Individual
  and select a decoration type, material, color, size and angle in the Decoration Selection dialog. Click to place decorations.
Undo to remove the last decoration.
Place Individual Beads on an Embroidery
-
Load the desired background and embroideries.
-
Position the embroideries as desired.
-
In the Category section of the Embellish window
 , select Decoration
  .
. -
Click Place Individual
 .
. -
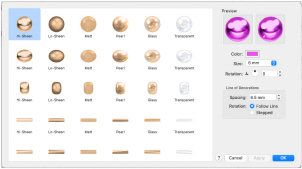
In the Decoration Selection dialog, click to select the desired bead type and material. See Decoration Selection.
-
Click Color and use the Colors window to select a color.
-
Set the desired bead Size, and use Rotation to set the bead angle.
-
Click OK to close the Decoration Selection dialog.
-
Click in the work area to place the bead. Each click will place one bead.
-
When you have placed all the beads as desired, Control–click and select "Finish placing individual" in the Context menu to end.
-
Repeat the process to place more beads.
-
Choose File > Export Decoration Template to create a crystal transfer template (or rhinestone template) for pressing hotfix crystals and nailheads directly onto your work. See Export Decoration Template.
Note: The pointer changes to the Insert cursor  to show that you may place beads.
Use Undo to remove the last bead.
Note: Drag has no effect while placing beads.