Use Express Appliqué
to automatically find appliqué stitches within an existing embroidery, and apply an appliqué fabric to them. Select a fabric and optionally apply an overlap margin.
To add appliqué fabric to an existing embroidery with Express Appliqué
-
In the Appliqué window, select an appliqué embroidery with no fabric, click Express Appliqué

, then select a fabric in the Appliqué Selection dialog.
Add fabric to an existing appliqué embroidery with Express Appliqué
Note: This exercise uses items from the full set of Backgrounds. See Backgrounds.
-
Choose File > Open to open an existing embroidery.
-
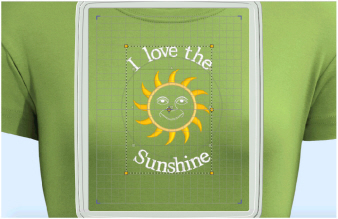
Browse to the folder mySewnet/Samples/Embroidery/Stitch and load the embroidery 'Sunshine Applique Large with Lettering'.
-
Choose File > Duplicate to open a copy of this embroidery.
-
Click the Load Background
 button on the toolbar. The Background Assistant opens.
 -
Select Load Previously Saved and click Continue.
-
Click Select, and load Garments/Ladies/T-Shirts Round Neck/Medium/T-shirt 1 Med Green_Lt.
-
Use Move and Rotate Background

to move the T-shirt downwards.
-
Open the Appliqué window
 of the Control Panel
  .
. -
Click Express Appliqué

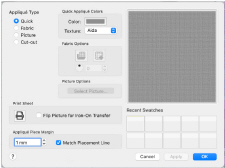
. The Appliqué Selection dialog opens so you can choose a fabric for your appliqué.
Note: Express Appliqué detects the pattern of Stop and Color Change Commands used by appliqué placement stitches and inserts appliqué fabric in that area. -
In Appliqué Type, click Fabric.
-
Click Load Previously Saved Fabric

to load a fabric in the Viewer.
-
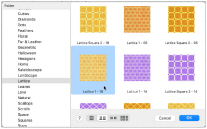
Browse to the folder General\Lattice.
-
Click the fabric Lattice 1 - 18, then click OK. The Viewer closes and the fabric is shown in the Appliqué Selection dialog.
-
Click OK to close the Appliqué Selection dialog. The fabric is shown under the sun’s face, as if you had stitched it down as an appliqué.
-
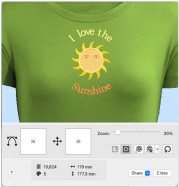
In the toolbar, click Life View

.
-
Move the Zoom Bar slider to the left so that you can see the t-shirt as well as the embroidery.
Note that the threads for the sun’s face and lettering are white. -
Click Solar Reactive

. The white threads turn yellow and orange.
-
Choose File > Save and save the embroidery with the appliqué and background as ’Sunshine Applique Large with Lettering and Background’.
Note: The sun and lettering will be stored separately within this multipart embroidery, making further adjustment easier.
Note: The embroidery is loaded as a multiple selection with the hoop included. If you used Insert, the initial hoop would be retained, but the embroideries are inserted as a group.
Note: This ensures that you do not overwrite your original.