The mySewnet™ Cross Stitcher toolbar gives one-click access to many of the features you will use as you work in mySewnet™ Cross Stitcher. You can add, remove, or rearrange toolbar buttons as desired.
The default set of toolbar buttons is shown below.

To Customize the Toolbar
-
Choose View > Customize Toolbar. Alternatively, Control–click in the toolbar and choose Customize Toolbar.
-
Make changes as desired: drag items to add or remove them, to return to the defaults drag the default set, choose an icon/text type from the Show menu, and select the size.
-
Click Done.
Control Panel
Use the Control Panel to edit cross stitch designs, repeat designs with Multiply, add lettering, and add patterns.
To Open the Control Panel
-
Click the Control Panel button
 in the toolbar.
 -
Choose View > Show Control Panel (⌘/).
There are 5 windows in the Control Panel:
|
|
Design |
Select thread colors for drawing stitches, edit the notes, and rotate or multiply the design. See Design Window. |
|
|
Create |
Draw individual crosses, backstitch and French knots, or create outline and filled shapes. See Creating Stitches and Shapes. |
|
|
Multiply |
Duplicate stitches around reflection lines. See Multiply. |
|
|
Letter |
Add lettering using TrueType® or OpenType® fonts. Also use pre-digitized Fixed fonts. See Creating Text. |
|
|
Pattern |
Select a fill pattern for flood fill, shape drawing and TrueType® text. See Using and Designing Patterns. |
Menu Bar
The mySewnet™ Cross Stitcher menu bar is visible if mySewnet™ Cross Stitcher is the active window.
There are five menus in addition to the Apple (![]() ) menu and the application menu: File, Edit, View, Window and Help.
) menu and the application menu: File, Edit, View, Window and Help.
-
To access the menu options, use the mouse to pull them down from the menu bar.
Insert
Use the Insert dialog to select cross stitch designs to customize.
Note: Use Insert to customize a design as part of a new project, and use Open to change the original design. See Open.
To Insert a Design
-
Choose File > Insert (or ⌘I).
Alternatively, click Actions
on the toolbar and choose Insert.
-
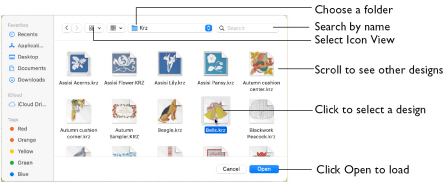
Browse to the desired folder in the Open dialog.
-
Switch to Icon View to see thumbnail pictures of the designs in the folder.
-
Scroll to view the other designs in the folder.
-
Click a design to highlight it.
-
Click the Open button to load the design.
The design is placed in the current window.
Design Area
The design area is the area within the work area where stitches can be placed and edited. Use View Mode to switch between 3D ![]() , 2D
, 2D ![]() and Block
and Block ![]() cross stitch views.
cross stitch views.
When the grid is shown, this shows the extent of the design area. If there is a background picture, this is only shown within the design area.
Background Grid
When the Grid is on, the design area shows grid lines with uniform spacing. If chosen, there may be dark grid lines every five or ten grid squares. Zooming in or out makes the grid squares look bigger or smaller.
Select the Grid and its Size
-
To turn the Grid on or off, choose View > Grid (or ⌘.).
-
To change the size of the grid squares, choose Edit > Design Properties (or the Design Properties button in the Design window
 ) and set the size.
Design Information
The stitch count ![]() , dimensions (height
, dimensions (height  and width
  ) and number of colors
  for the design are shown in the Information area of the Design
  window.
Note: When French knots are placed on the corners or edges of the design, the created design may be larger than the design area, and the desired hoop. Use the Design Information to check the design size.
Color Select
The Color Select area of the Design Window  shows the colors used in the cross stitch design. See Color Selection.
Zooming In or Out
You can enlarge (zoom in) or reduce (zoom out) your view of the work area.

Zoom To Fit ![]() shows the hoop so that it fills the window. This is the default size. Click the center marker on the zoom slider to see the design at 100% or real size. See Zooming In or Out.
shows the hoop so that it fills the window. This is the default size. Click the center marker on the zoom slider to see the design at 100% or real size. See Zooming In or Out.
Using Text and Number Boxes
To view changes made in a text or number box, click in another text/number box, or press the Return key. This refreshes the view.