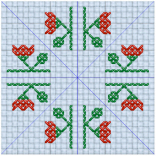
Use Multiply to create symmetrical designs easily. All changes in the design are reflected across, down or rotated.
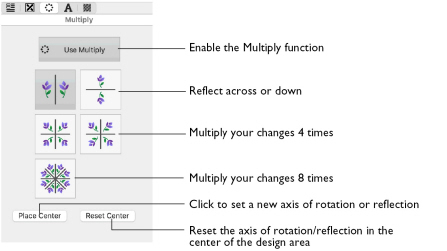
Use Multiply to create symmetrical designs quickly and easily. All changes in the design, such as adding and removing stitches, pasting selections and inserting designs, are multiplied.
Note: You cannot use the selection tools to make new selections when Multiply is active. However, you can use them before activating Multiply to select and copy a selection, which can then be pasted and multiplied.
To use Multiply
-
Select the Multiply window
 in the Control Panel
  , then click Use Multiply
  and select one of the Multiply options. Draw or insert the stitches to be reflected.
Choose one of the reflection or rotation options to repeat actions. The blue Multiply reflection lines on the design area show how your actions will be repeated.

Create an Embroidery Pattern with Multiply
-
Select the Multiply window
 in the Control Panel
  , then click Use Multiply
  . The blue reflection line(s) appear in the design area.
 -
Select one of the Multiply methods to choose the number of reflections and rotations.
-
If desired, click Place Center to reposition the central point of the blue Multiply lines.
-
Click Reset Center to set the reflection lines to the center of the design area.
-
Draw or insert the stitches to be multiplied.
-
Click Use Multiply
 again to remove the reflection lines and return to standard design creation.
Create a Decoration for a Sampler Title with Multiply
-
In the Appearance tab of mySewnet™ Configure

, set the Background Color to a pale yellow, and set the Background Texture to Aida.
-
Open mySewnet™ Cross Stitcher

, and in the Design Options page of the Cross Stitch Design Assistant select Load Existing Cross Stitch Design, and then click Continue.
-
In the Open Existing Design page, click the Select File button and browse to /mySewnet/Samples/Cross Stitch/Krz/MySamplerBorderTitle.krz. Click Done to close the assistant.
-
Open the Multiply window
 in the Control Panel
.
-
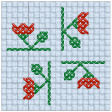
Click Use Multiply
 . Blue reflection line(s) appear in the design area.
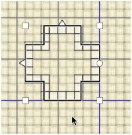
Note: The reflection lines are not part of the design. They only show the effect of the Multiply feature. -
Click to select Reflect Across and Down
 .
. -
Click Zoom To Rectangle
 and the arrow pointer changes to the zoom in pointer
  .
. -
Drag around the center of the design where the reflection lines cross.
-
Open the Create window

in the Control Panel

.
-
Click the Cross Outline
 option.
 -
Click the Outline color for Shapes and in the pop-up color palette select Robison-Anton Rayon 40 2581 Old Dark Tex Orange.
Note: This was the final color used in the lettering. -
Choose shape 65 (a cross) from the Shape pop-up menu.
-
Click the Shape
 button to place the shape in the design area.
 -
Hold down Shift and drag to resize the cross proportionally until it is nine squares across and down.
-
Move the cross up against the reflection lines.
-
Control–click and choose Finish Insert Shape Tool to place the shape. Four copies are drawn as it is multiplied around the reflection lines.
-
Select the Pattern window

of the Control Panel

.
-
Select French Knots as the Category, then scroll to choose Centers Sparse in the pattern list.
-
Select the Create window

of the Control Panel

.
-
Click the Pattern Flood Fill icon
 then click inside the top left cross.
Note: Notice that all actions, including Flood Fill, are multiplied across the reflection lines.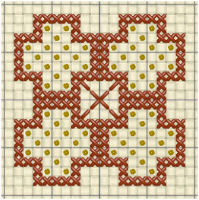
-
Click the thread color in the upper part of the Create window, then click the mid-brown color in the pop-up palette (Robison-Anton Rayon 40 2581 Old Dark Tex Orange).
-
In the Create section, select Half Cross Forward
 .
. -
In the area in the middle of the crosses, click twice to place two half crosses from the center, up and to the right.
-
Select the Multiply window
 in the Control Panel
.
-
Click Use Multiply
 so that it is unchecked. The blue reflection lines are no longer shown.
 -
Click Zoom To Fit
 .
. -
Click Box Select
 , then drag around the motif in the center of the design area.
 -
Drag the motif to the gap between 'MY' and 'SAMPLER'. Position it two squares from the top border, and so that it is not touching the 'Y' or 'S'.
Note: Now create some lower case letters for the sampler. See Add Letters and Numbers to a Sampler.
Note: Alternatively, use the design you created in Create Title Text for a Sampler.