Use Place Shape  to select one of 120 shapes and create an outline or filled area using that shape. Then adjust its size.
Draw a ring, a square, a star or other shape using Place Shape.
Select Place Shape
-
In the Create window
 of the Control Panel
  , choose a Shape from the pop-up menu, then click Place Shape
  .
.
Create a Shape
-
In the Shape section of the Create window
 select a fill and outline type.
 -
If drawing a shape with a Backstitch Outline

, you may select Smooth to smooth the outline of the shape by using three-quarter crosses rather than full crosses.
Note: Cross Outline
is not affected by Smooth.
-
Click the thread color next to your Fill and Outline choices and select a color for Cross Fill and your outline.
-
Change the colors for a Pattern Fill

in the Pattern window. When a fill pattern is selected, its colors may also be changed. See Select a Pattern.
-
Choose a shape from the Shape pop-up menu.
-
Click the Shape
 button to place the shape in the design area.
Note: The outline and fill will use the chosen colors and stitch type. -
Drag the shape to the preferred position, and resize it as desired using the square corner handles.
Note: Hold down Shift as you drag to resize proportionally. Hold down the Option key to resize from the center.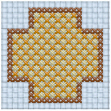
-
Control–click the shape and select Finish Insert Shape Tool to place the shape in the design area
-
If desired, draw another shape or use Undo and draw the shape again.
Note: If a color is chosen that does not exist in the palette, it is automatically added to the palette when a shape is drawn in that color.