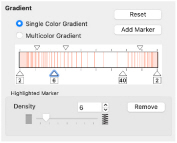
Use Single Color Gradient to change the density across a fill with only one color. Set a value for the start and end density markers for the fill, and the density gradually changes between the two values. Add multiple markers for a more complex pattern. The higher the value, the less dense the fill.
Use the adjustment marker above the gradient bar to change the gradient across the fill.
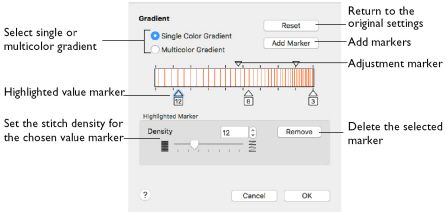
The markers can each take a value of 2 to 40, which means you can reverse the gradient simply by swapping the start and end values. A higher value means the fill is less dense.
The initial start marker density setting is 2, and the end marker density setting is 8.
Reset
Return to the initial settings.
Add Marker
Add Marker places an new value marker below the gradient bar, and an extra adjustment marker above the gradient bar. The initial value for the marker is between the existing markers. Any combination of density values is possible across a fill area.
-
Click Add Marker to add new markers, then edit the density value and move the value and adjustment markers as desired.
Density
Set the fill density. The higher the number, the less dense the fill.
-
Use the slider or the numbers box to set the Density of the stitching from 2 to 40.
Remove
Click Remove to delete the highlighted marker.
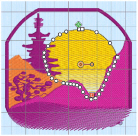
Use Single Gradient Fill on a Landscape Embroidery
-
If required, choose File > New.
-
Choose Edit > Insert > Insert Design.
-
In the folder mySewnet/Samples/Stitch Editor/Stitch load the 'SunsetGarmentBagOriginal' embroidery.
-
Select the Object
 window of the Control Panel
  . The pointer changes to the Object Select
  pointer.
 -
Move the pointer until the sun is highlighted and click to select it.
-
In Edit Properties, click the Properties button. The Pattern Fill properties dialog appears.
-
In the Density section, select Gradient.
-
Click the ellipsis (3 dots) button to open the Gradient dialog.
-
Select Single Color Gradient.
-
Click the value marker on the left (the marker below the gradient bar) and change the value in the Density box to 2.
-
Click the value marker on the right and change the value in the Density box to 40.
-
Click OK twice to close the Gradient dialog and the Pattern Fill dialog, and view your changes in the work area.
-
With the sun still selected, open the Properties and Gradient dialogs again and move the adjustment marker above the gradient bar to vary the change in density across the fill.
-
Click OK twice to view your changes as desired. Open the Gradient dialog again to make further changes.
-
Click Add Marker to add another value marker and adjustment marker.
-
Change the density of the fill as desired.
-
Click OK to close the properties dialog.
Note: All of the icons are unavailable (dimmed) as no area of stitches is selected.