Satin Line is a line of constant-width satin stitch. It can be used alone, or as a border to a fill. The width of the line can be set from 1 to 12mm.
To show the Satin Line dialog
-
With a satin line selected, Control–click and choose Edit Satin Line.
-
With a satin line selected, click the Properties button.
-
Convert a line type to Satin Line in the Object window. The Properties dialog appears.
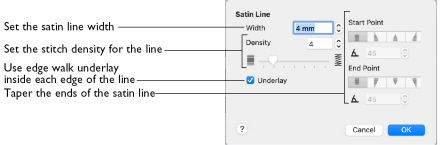
Use the Satin Line dialog to set density and width for satin lines and borders.
Density
Set Density from 2 to 15. The lower the number, the closer together the stitches and the more stitches are produced. The initial setting is 4.
Note: Embroidery on thicker fabrics usually looks better with more stitch coverage (a low density setting). Choose a low value such as 2 or 3 for heavy knit fabrics, and a higher value such as 5 or 6 for a light material like linen or satin.
Width
Set Width for satin border from 1 to 12mm. The initial setting is 4mm.
Underlay
Use this option to place edge walk underlay inside each edge of the satin border. Underlay will not be generated if the Border Width is set below 2mm.
Tapered Ends
The Start Point and End Point settings can be used to taper the ends of your satin lines.
Note: Use these options to create mitered or pointed ends for your satin lines.
Start Point
Use these options to change the type of line beginning for the satin line. Select a taper type, then set the Taper Angle

.
Use these options to change the type of line end for the satin line. Select a taper type, then set the Taper Angle

.