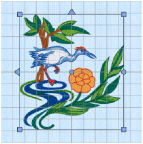
Move Block
Drag a block to move it. Any stitches which lead to or from the block are stretched to accommodate the new position of the stitches moved in the block.
-
Click inside the block and drag
 it to the required position.
Nudge
A block of stitches can be moved in small amounts to nudge it accurately into the desired position.
-
Use the arrow keys on the keyboard to nudge a block.
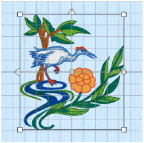
Resize Block and Scale Block
Use Resize ![]() to switch between resize and scale.
to switch between resize and scale.
-
Use resize to change the size of the block and retain constant density.
-
Use scale to change the size of the block and retain constant stitch count.
The handles on the block selection show when resize or scale is selected.
Alternatively, click Modify Block  and enter the desired percentage values in the Height % and Width % boxes to see what the actual height and width will be in millimeters.
Note: Use Resize Preferences to adjust the resize settings, for example if you make large changes to the size of a block. The Stitch Optimizer is used automatically after each resize, as selected by default in Resize Preferences. (Choose mySewnet™ Stitch Editor > Preferences (or ⌘,), Resize  .)
.)
To Switch between Resize and Rescale
-
Click the Resize button
 in the toolbar.
 -
Choose Edit > Resize Mode.
-
Press ⌘R
Resize and Rescale a Block or Embroidery
-
Open the Design
 window of the Control Panel
  .
. -
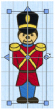
Select a small embroidery (for example, Toy Soldier in mySewnet/Samples/Embroidery/Stitch) and place it in the bottom left corner of the hoop.
-
Click Select All Visible

to select the whole of the embroidery.
-
With a selection box around the embroidery, click Resize
 until the handles are white.
 -
Look at the stitch count

in the Information section of the Design window.
-
Move the pointer over one of the square corner handles

and it becomes the diagonal double-arrow pointer

.
-
Drag the handle at the top right until the embroidery is much larger.
-
Click Actions

> Undo or ⌘Z to return the embroidery to its original size.
-
Select the embroidery again, and click Resize
 until the handles are blue.
 -
Drag the handle at the top right until the embroidery is several times larger.
Gaps appear between the stitches. Although the size has increased, the stitch count has remained the same.
Hold down Shift as you drag to resize or scale proportionally. Hold down the Option key to resize or scale from the center.
The stitching in the embroidery remains dense, as the stitch count has increased greatly.
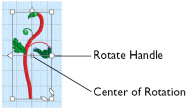
Rotate Block
Rotate the selected block of stitches to any degree using free rotation with the mouse, entering a specific angle or rotating in 45 degree steps.
If desired, move the center of rotation before rotating the embroidery.
Rotate a Block
-
Select the block and use the round rotation handle to rotate it freely. See Using Free Rotation.
-
Select the block, and in the Design window click Rotate 45
 to rotate the block by 45 degrees. See Rotate 45.
 -
When using a trackpad, twist your thumb and forefinger to rotate the selected block.
-
Select the block, and in the Design window click Modify Block
 . In the Modify Block dialog rotate the block, then click OK. See Modify Block Dialog.
Using Free Rotation
-
Select a block.
-
Move the pointer over the round rotation handle and it changes to the rotate pointer

.
-
Drag the rotation handle to rotate the block freely to any angle.
The block is rotated around the center of rotation
.
-
Release the mouse button. The block is now in its new position.
-
Undo to return to the original angle.
Move the Center of Rotation
The center of rotation  is initially shown in the middle of the selection. Drag it to change the pivot point around which the embroidery rotates for any of the rotation methods.
Note: Click outside the selection box and then select again to return the center of rotation to its initial position.
-
Move the pointer over the center of rotation and it changes to the cross-hair pointer

. Click on or within the center of rotation, then drag it to any position in the work area.
Rotate 45
Rotate 45 rotates the selected block or area of stitches in 45 degree steps.
Note: To rotate an embroidery freely in the work area, see Using Free Rotation.
To Rotate a block or area of stitches by 45 Degrees
-
Select the block, then in the Design window click Rotate 45

.
-
Select the block, then choose Design > Rotate 45.
Undo to return to the previous angle.
Flip Vertical or Horizontal and Skew
Mirror a block of stitches vertically or horizontally using the flip handles on the block selection box, or skew it with the trapezoidal skew handles.
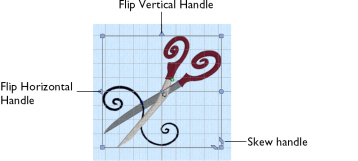
To Flip Horizontally
-
Move the pointer over the Flip Horizontal handle and it becomes the horizontal double-arrow pointer. Click the Flip Horizontal handle to mirror the block horizontally.
To Flip Vertically
-
Move the pointer over the Flip Vertical handle and it becomes the vertical double-arrow pointer. Click the Flip Vertical handle to mirror the block vertically.
To Skew
-
Move the pointer over one of the trapezoidal Skew handles in the bottom right corner of the block and it becomes the vertical or horizontal double-arrow pointer. Drag to skew the block.
Reverse Order of Stitches
Use Reverse Order of Stitches to reverse the order of stitches in the same thread color, stop and trim sequence, within the selected block.
Only continuous sets of stitches can have their order reversed. Stitches are a continuous set if they are immediately in sequence one after the other, with no commands (color changes, stops and trims). This ensures that the order of color blocks is preserved, as well as the sequence of stops and trims.
Use Reverse Order of Stitches
-
Select the block, then choose Design > Reverse Order of Stitches.