Use the Page Setup options to choose what to print. Any combination of embroidery worksheet, plan view and an individually printed picture can be selected.
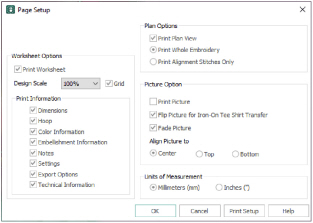
At least one of the main print options, Print Worksheet, Print Plan View or Print Picture, must be selected or there will be nothing to print. You may not close the Page Setup dialog box if none of these options is selected.
Shortcuts
-
Keys: Alt, F, U
Select this option to print a worksheet for the embroidery. Use the Embroidery Options and Worksheet Options to alter the appearance and contents of the printed worksheet.
Select this option to print a plan view of the picture, with either the whole embroidery or the alignment stitches printed over the picture. When stitching out, use the plan view as a guide for aligning the embroidery to the picture.
Select this option to print a page that shows only the picture.
When you are ready to print the picture onto printable fabric or an iron-on transfer, select only this option. That is, deselect Print Worksheet and Print Plan View. This is so that you can load your printer with the printable fabric or transfer, without printing the worksheet or plan view first.
The picture can optionally be flipped and/or have the colors faded by 50%.
Select the information to be printed on the worksheet, such as the Dimensions, Color Information, Notes and Technical Information. In addition, the scale may be altered and a grid turned on or off.
Select 25%, 50%, 75% or 100% scaling when printing your embroidery. This is how large the embroidery will print compared to the real size of a stitched out embroidery. Use a reduced Design Scale if you want to ensure that the worksheet fits on one page. Use Print Preview to see how many pages will be printed.
This determines whether or not a grid will be printed with the embroidery. If you turn this off you will still get a rectangle representing the hoop.
This determines what additional information is printed. All items are selected initially.
The size of the embroidery and the stitch count.
The hoop used for the embroidery.
The sequence of thread colors used and, if available, the thread specification (range and thread number). Stop Commands are also shown.
Embellishment Information
Information on the decorations used, and their size, color and number.
Any notes or settings that are included with the embroidery.
The Export settings for the embroidery.
The distance of each edge of the embroidery from the center of the embroidery.
Choose how to print the embroidery when you print the plan view. Use the plan view as a guide for aligning the embroidery to the picture.
Print a plan view of the embroidery, or the alignment stitches.
The whole embroidery will be printed on the plan view. If there are alignment stitches under the embroidery, they may be obscured by the embroidery.
Only the first color block in the embroidery will be printed. If the alignment stitches will be obscured by the rest of the embroidery, choose Print Alignment Stitches Only. Otherwise, it is generally better to choose Print Whole Embroidery.
Print the picture for the embroidery.
Flip Picture for Iron-On Tee Shirt Transfer
Use this option if you are printing onto iron-on transfer paper, instead of printing directly onto the fabric. This is typically used for transferring the picture to a tee-shirt. Using iron-on transfer paper flips the picture, so use this option to flip it back again, ensuring that the picture is correctly orientated when it is ironed onto the tee-shirt.
Use this option to fade the picture by 50%, if desired. This will make the threads stitched over the picture stand out.
Fade Picture affects both the plan view and the individually printed picture.
Use this option to position the printed picture on your printable fabric or transfer paper. If you have a small picture, you can use this option to conserve the printable media by moving the printed picture to the top or bottom of the page. Alternatively, use center alignment to make hooping up easier.
Choose from Center, Top or Bottom. Use Print Preview to verify the size and position if you have already printed on the other part of the media.
Set the Units of Measurement for the Dimensions and Technical Information to mm or inches, as desired.
Click the Print Setup button to see the Print Setup dialog box that is used to select the printer, what paper to use and the paper orientation.