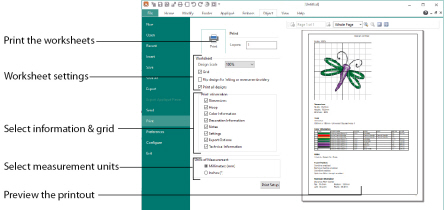
Select the printer and page layout in print setup, and choose a scale, hoop, units of measurement, and details to be printed. Then click Print to print the embroidery worksheet and/or overview.
Shortcuts
-
Quick Access Toolbar:

Click Print to open the Print page and print the project. See Print.
Worksheet
Select the format of the worksheet. Select a Design Scale, whether to use a grid, and whether to filp the design. Choose the information to show for the embroidery in the worksheet (Dimension, Color Information, Notes and Settings and Technical Information).
Select 25%, 50%, 75%, 100% or ’to fit’ scaling when printing your embroidery. This is how large the embroidery will print compared to the real size of a stitched out embroidery. Use a reduced Design Scale if you want to ensure that the worksheet fits on one page. Look at the print preview pane to see how many pages will be printed.
This determines whether or not a grid will be printed with the embroidery. If you turn this off you will still get a rectangle representing the hoop.
Flip design for felting or reverse embroidery
Flip the embroidery for being stitched in reverse, or for felting effects.
Select this to print all of the designs in the embroidery, or uncheck to print only the selected subdesign.
This determines what additional information is printed. All items are selected initially.
The size of the embroidery and the stitch count.
The hoop used for the embroidery.
The sequence of thread colors used and, if available, the thread specification (range and thread number). Stop Commands and their text (where present) are also shown.
Information on the decorations used, and their size, color and number.
Any notes or settings that are included with the embroidery.
The Export options used for the embroidery, as set in the Export dialog box.
The distance of each edge of the embroidery from the center of the embroidery.
Select between Millimeters and Inches.
Print Setup
Click Print Setup to select a printer in the Print Setup dialog. Choose the units of measurement (inches or millimeters) and print quality. Select and enter details for a table of contents.
Preview Pane
The preview pane displays the embroidery as it would appear when printed. Other information, such as the Dimension, Color Information, Notes, Settings and Technical Information, is shown depending on the choices made in the Worksheets section of the Print dialog box.
The print preview toolbar offers you options to zoom in and out of the page, and to show multiple pages ![]() or individual pages
or individual pages ![]() . If there are multiple pages, step through them with Next Page
. If there are multiple pages, step through them with Next Page ![]() and Previous Page
and Previous Page ![]() .
.
If you are trying to preview an embroidery that does not lie entirely inside its hoop then the preview will not be shown and a message will appear instead of the Print Preview. Solve this by changing the hoop size or adjusting the embroidery so that it fits the hoop.
The print preview toolbar offers you the following options:
Preview the next page  to be printed. If this is grayed out when you are on Page 1 then there are no more pages and the print fits on one page.
Preview the previous page  to be printed.
Select  how many printed pages to preview at a time.
Individual Page
Preview only one  page at a time.
Take a closer look at the page to be printed.
Take a larger look at the page to be printed.