The points that define the currently selected stitch object (satin column, fill area, running stitch, etc.) are shown as small squares and circles.
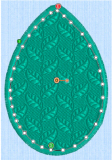
The object type is shown in the Edit Properties area of the Object tab. The points used to start and end fill and satin areas are shown by the start  and end
  markers. Some types of fill areas also have an origin, marked by an orange circle
  , or for Pattern Fill an orange circle with a handle
  . Satin areas also have stitch angle lines with hexagonal ends.
Move the pointer until the desired area is highlighted, then click it on the work area. When selecting an object, click near one of the points that define it.
Once the points are shown, click and drag the squares or circles to move them. The first point is shared with the previous object, and last point is shared with the next object, so moving these will also change the shape of those objects.
When a different point is selected for the start or end of a fill or satin area, a movement stitch (trim) may be added to prevent the previous or next object changing shape.
Moving the points that define a satin area may also affect the stitch angle lines, but moving the stitch angle lines does not affect the shape of a satin area.