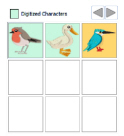
-
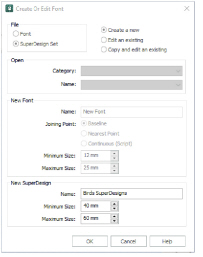
Start mySewnet™ Font Digitizing and the Create or Edit Font dialog box appears.
-
In File, select SuperDesign Set. Notice that Open and the New Font options are unavailable.
SuperDesigns are placed individually in mySewnet™ Embroidery, therefore joining point is irrelevant. All SuperDesign sets are saved in one folder. -
Enter a Name for the SuperDesign set.
-
Enter the desired Output Size Range.
-
Click OK and the work area appears ready for you to digitize the first SuperDesign, as shown in the title bar.
-
Right-click the initial color in the FilmStrip, and select Properties. Choose the desired thread color in the Color Selection dialog box.
-
In the Create tab, select the desired Area and Line type from the Control Panel.
-
Click Save
 in the Font tab to save the changes you have made
Click Options for the selected area or line type to set the pattern, angle, density etc. The options set for the first SuperDesign in a set will be the default settings for all other SuperDesigns in the set. -
To digitize over an existing picture, click the View tab, then click Edit Background

to open mySewnet™ Draw & Paint.
-
Use Insert
 or Open to load your picture.
 -
Resize and position your picture as desired, then save your edited picture within mySewnet™ Draw & Paint if you may need it again.
-
Close mySewnet™ Draw & Paint to return to mySewnet™ Font Digitizing.
-
Move the guidelines to the desired positions.

-
Digitize the SuperDesign using the stitch types on the Create page in the Design window. You will be warned to save the SuperDesign if you select a new function.
Unlike the fonts, you can digitize a SuperDesign set in any order. It is not necessary to start with the first design, although this is advisable. The first design is used to set the size of the SuperDesigns in mySewnet™ Embroidery. The size of all the SuperDesigns in the set is set relative to the first design. -
Click Save
 in the Font tab to save the changes you have made to the SuperDesign.
 -
After you have created the SuperDesign, use Save Picture
 to save the thumbnail for the SuperDesign.
 -
Ensure that Create / Update Thumbnails is selected while creating thumbnail pictures.
-
In the Font page, choose the next SuperDesign to digitize.
-
If required, load or paste a picture in mySewnet™ Draw & Paint, then save the edited picture.
-
Digitize the SuperDesign as desired, then save it. You will be warned if you select another function without saving.
-
Repeat as desired until the maximum of 9 SuperDesigns have been digitized.
-
Click Save
 in the Font tab to save the changes you have made to the SuperDesign.
 -
Click Universal Properties
 to standardize the use of object types, or to change the object types, within a SuperDesign set, and select which properties will be editable.
 -
In Colors, edit a color to make the colors consistent across the SuperDesign set.
-
In ’Select Object’, choose the line and fill types to be standardized.
-
You can also change a stitch type for the whole SuperDesign set. Select the stitch type in the Select Object pane, then choose a new stitch type from the Convert drop-down list.
-
Click Convert to change it to the new stitch type.
-
Make any other desired changes to the colors and stitch types, then click Next. The Universal Properties - Finalizing dialog box appears.
-
In ’Allow Editable’, select the line and fill types to be made editable in other mySewnet™ Embroidery Software modules.
-
Click OK to standardize the SuperDesign set.
-
Start mySewnet™ Font Digitizing and the Create or Edit Font dialog box appears.
-
In File, select SuperDesign.
-
Select ’Edit an existing’. The Category drop-down list becomes available.
-
In Category, select MyFonts, or the Category where you saved your SuperDesign set.
-
In the Name drop-down list, select the SuperDesign set that you want to continue working on.
-
Click OK to select the SuperDesign set.
-
Click the design that you want to edit.
-
To load an existing background picture, click the View tab, then click Edit Background

to open mySewnet™ Draw & Paint.
-
Browse to your saved background picture to load it, then close mySewnet™ Draw & Paint.
-
In the mySewnet™ Font Digitizing work area, click an object to display its points and reshape the object as desired. Right-click it to show its properties.
-
Click Save
 in the Font tab to save the changes you have made to the SuperDesign.
 -
Continue to select and digitize SuperDesigns as desired.
-
When you are ready to end your session, save the SuperDesign set.
-
To remove unused space in the SuperDesign file, click Universal Properties
 , then click Next.
 -
In the Universal Properties - Finalizing dialog box, select (check) Compress font. Then click Finish.
-
Click Exit
 to close mySewnet™ Font Digitizing.
 -
Browse to the folder ProgramData\mySewnet\Embroidery1\SuperDesigns\MySuperDesigns and select the SuperDesign sets you want to back up.
-
If desired, browse to a different folder where you wish to keep backup copies of the SuperDesign sets. For instance, you could create a folder in 'My Documents' called 'SuperDesign Backups' and use this for storing backup copies. This will also prevent the backup copies from appearing in the SuperDesign list in mySewnet™ Embroidery.
-
Paste the copies into the destination folder.
-
Change the name for the backup of your SuperDesign set. For instance, include the date and time in the name to indicate when the backup was made.

mySewnet™ Draw & Paint opens with a work area the size of your work area in mySewnet™ Font Digitizing.
To digitize over a small part of an existing picture: in mySewnet™ Draw & Paint select, crop and resize the desired area of the picture, then return to mySewnet™ Font Digitizing.
The modified picture will then be available in the correct position if you wish to edit the SuperDesign later, as background pictures are not saved within the SuperDesign file.
Digitize the First SuperDesign
Use Open Picture ![]() to reload your thumbnail picture in mySewnet™ Font Digitizing. Reload your background picture from mySewnet™ Draw & Paint.
to reload your thumbnail picture in mySewnet™ Font Digitizing. Reload your background picture from mySewnet™ Draw & Paint.
Use Save Picture ![]() to save your thumbnail pictures.
to save your thumbnail pictures.
Standardize the SuperDesign Set (Optional)
Universal Properties will make the properties of all SuperDesigns in the set the same as the properties for the first design in the set.
Use Universal Properties to correct any properties inconsistencies when creating the SuperDesign set.
Do not use Universal Properties on a SuperDesign set where complex properties were used, for example if more than one fill pattern or motif was used, or if fill areas of the same type are stitched at different angles. If you are not sure how using Universal Properties will affect your SuperDesign set, edit a copy, not the original.
If you make a mistake, use Reset to return to your original settings.
You can deselect Create / Update Thumbnails before finally saving to prevent inserted images from being automatically replaced when the SuperDesign set is saved.
Reopen a Partially Completed SuperDesign Set
To work on a copy of a SuperDesign set, select ’Copy and edit an existing’, and select the SuperDesign set from the drop-down list. Give the copy a name.
System SuperDesign sets must be copied to be tested or used. SuperDesign sets that you create or customize can only be used from the SuperDesigns folder.
SuperDesign sets are compressed automatically whenever they reach a certain size, however it is good practice to compress the SuperDesign set as a final step.
You must close the SuperDesign file if you wish to test your SuperDesign set in mySewnet™ Embroidery.
A SuperDesign set can take some time to digitize. At the end of a long session of digitizing, you should make a backup copy of the SuperDesign file.
If you are not sure what the effects of an edit will be, edit a copy of your SuperDesign set when you open it, not the original.
This is also where you can delete unwanted SuperDesign sets.