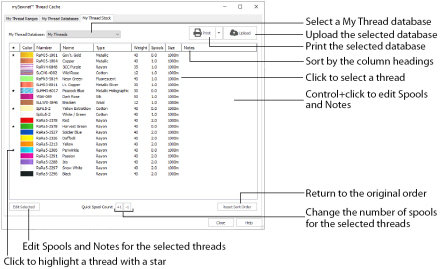
Use the My Thread Stock window of mySewnet™ Thread Cache to note the quantity that you have of each thread in the selected My Thread Database, and to print the list or upload it to the cloud, ready to view on the Thread Cache website on your mobile device.
Create a My Thread Database and View it on your Mobile Device
-
In mySewnet™ Thread Cache, click the My Thread Databases tab.
-
In the My Thread Databases section, click Add New Thread Range

.

-
In the Thread Database Name dialog, enter a name for the new thread database.
Use your own name (such as Janes Threads 1), a manufacturer name, or keep the suggested name. -
Click OK to create the new database.
-
Click the My Thread Ranges tab.
-
Click your new My Thread database to highlight it.
-
If needed, click the Add To My Thread Ranges arrow

icon. Janes Threads 1 (or the name that you used) is added to the end of the My Thread Ranges list.
-
Click the My Thread Databases tab.
-
In the drop-down menu, choose a manufacturer’s thread range, for example Sulky Rayon 40, from the list. The list of threads changes according to the chosen range.
-
Click in the Number box and enter 1023.
-
Click the color block to select it, then click the Add To My Threads arrow

icon. The thread SuRa5-1023 is added to your new thread database in the pane on the right (here Janes Threads 1).
-
Before adding threads, check the Preferences

for default Spool Size. This should be 1000m.
-
In the Quick Colors, click the green, number 6 in the second row. Thread 1277 (Ivy Green) is selected.
-

to add it to your list of colors.
Use the Quick Colors to select the nearest shade to the color you choose that is available from the current thread range.
You can use the drop-down menu to choose a different Quick Colors theme, or to create your own theme. -
Use the Quick Colors to add a blue and a red to your list of threads.
-
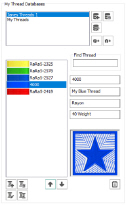
Below your new list of threads, click the Add New Thread

icon. The Thread dialog appears. For more information, see Add a New Thread to a My Thread Database.
-
Enter a Thread Number, for example 4000.
-
Enter a Thread Name, for example MyBlueThread.
The Thread Number can be up to 13 characters, including letters. The name can be up to 29 characters. -
Choose the Thread Type from the drop-down menu.
-
Choose the Thread Weight from the drop-down menu.
-
Click the color block in Single Color, and use the Colors dialog to select a blue color for the thread.
-
Click OK to close the Colors dialog, then click OK again to create the thread.
-
Click to select your new thread.
-
Click Move Up

. The blue that you just created moves one place up the thread list.
-
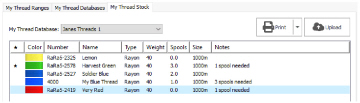
In the My Thread Database drop-down menu, ensure that your new database (here Janes Threads 1) is selected.
-
Click the Name column heading. The database is sorted by name.
-
Click the Reset Sort Order button. The list returns to its original order.
-
Highlight the blue thread that you created, and then click the Notes field for that thread to open it for editing.
-
Enter the text "3 spools needed" and press Enter. The note is added to the blue thread.
-
Highlight the yellow thread and click Quick Spool Count +1

. There is now one spool of the yellow thread.
-
Use Ctrl+click to select the green and red threads. Both are highlighted.
-
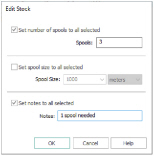
With the threads still selected, click the Edit Selected button. The Edit Stock dialog opens.
-
Select (check) the "Set number of spools to all selected" checkbox.
-
Set the number of spools to 3.
-
Select (check) the "Set notes to all selected" checkbox.
-
Enter the text "1 spool needed" in the Notes text box.
-
Click OK. Both threads are now listed as having 3 spools, and needing an extra spool.
Use the Edit Stock dialog to change the spool number, size, and the notes for several threads at the same time. -

column for the first of your selected threads. The thread is highlighted with a star.
-
Add a star to the other two threads with notes.
-
Click the column header star to sort by this column. All of the highlighted threads are now listed together. This is a good way to review your highlighted threads. (If desired, click again to sort descending so the highlighted threads are at the top of the column.) For more information, see Viewing and Sorting Threads in a My Thread Database.
-

. The Cloud Connection dialog appears.
-
Enter the e-mail address for your Software Registration Database account in the text box.
-
Enter the password for your Software Registration Database account in the Password text box.
-
Select (check) the Remember Password checkbox to save your password for the next time you sign in.
-
Click OK to upload your personal thread database (here Janes Threads 1) to the Software Registration Database.
-
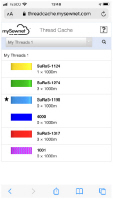
Open the mySewnet™ Thread Cache website on your mobile device:
threadcache.mysewnet.com -
Tap the Download Threads button

. The Cloud Connection Settings window is displayed.
-
Enter the e-mail address and password for your mySewnet™ account.
-
Tap Download My Thread Databases. Your thread databases are downloaded.
-
In the main window, select your personal thread database (here Janes Threads 1) from the My Threads drop-down list.
-
Tap one of the threads to see its details.
-
In the Thread pane, tap Purchased to set the thread to Purchased.
-
Tap Back to go back to the My Threads window. The thread is now marked with a P.
-
In the My Threads drop-down list, select Star Threads. Only your star threads are displayed.
For more information, see The Thread Cache Website. -
When you are back at your computer, update the thread spool information in your My Thread databases in mySewnet™ Thread Cache.
Note: Your new thread database will now be listed when you select My Thread Ranges in the Color Selection dialog.
As the number is entered, the thread appears and its details are shown, 1023 (Yellow).
Use Move Down

to move a color down the list, and Delete Thread

to remove a color from the list. Use Edit Thread

to change a thread, and Copy Thread

to copy an existing thread to use as the basis for a new thread.
You can sort by any of the headings.
Do not select this option if you are using a shared computer.
On a tablet a wide screen showing both the Thread and Details panes will be displayed.