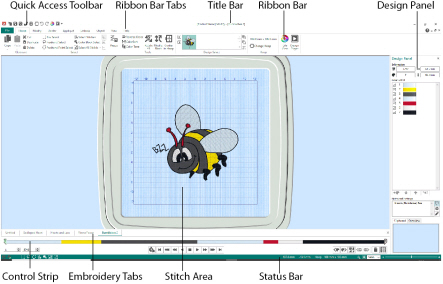
The Title Bar at the top of the window is highlighted if mySewnet™ Stitch Editor is active. Each open embroidery file also has its own tab showing the name of the embroidery file. The Quick Access toolbar gives icons for the following frequently used features: Insert, Save, Save As, Export, Print, Change Hoop, Undo, Redo, Life View and Design Player.
There are nine tabs on the ribbon: File, Home, Modify, Border, Appliqué, Emboss, Object, View and Help.
An alternative way to access the ribbon options is to press the Alt key, then the highlighted letter for the tab, followed by the highlighted letters for the item, e.g. Alt, V, 3 to view a file in 3D View. Some functions are available by pressing the Ctrl key and another key at the same time. These shortcuts are shown in the tooltip for the relevant function.
Use the Home tab to select subdesigns or stitches, copy, resize, move and rotate, change threads with Color Tone, and display embroideries with Life View and Design Player.
The Design Select area of the Home tab shows the different subdesigns or sections of a multipart design. Select the Next ![]() or Previous
or Previous ![]() section, change the order by moving subdesigns forwards
section, change the order by moving subdesigns forwards ![]() or backwards
or backwards ![]() , or combine
, or combine ![]() sections of a multipart embroidery.
sections of a multipart embroidery.
Use the Modify tab to make changes that affect the whole embroidery, to add and edit stitch commands, and to use the morphing and cutwork features.
Use the Border tab to add a satin or stitch border to an embroidery, optionally with appliqué stitches and fabric.
Use the Appliqué tab to add appliqué fabric to an existing design with appliqué areas, and to adjust appliqué areas within a design.
Use the Emboss tab to add lines or curves of stitch points and to apply stitch points in shapes (called stamps) one at a time, in lines or as a fill pattern.
Use the Object tab to change the properties for the fill and line objects in your embroidery, or to convert these stitch types to other fill and line types.
Use the View tab to adjust the Grid, change the view mode, view Commands and stitch coordinates, change the hoop, and arrange multiple windows.
The work area is the area where embroideries are loaded. Tabs along the bottom edge will show the names of any open embroideries. Click a tab to make it the active embroidery. Press Ctrl + Tab to cycle through the windows. When the embroidery file windows are maximized then the work area is filled by the active embroidery file. If the windows are not maximized, then arrange the windows in various ways using the Cascade and Tile options on the View tab, drag the title bars to arrange them as desired, or press Ctrl + Tab to cycle through the windows.
Use Cascade to arrange multiple windows in the work area in a step-like cascade so that you can see the embroidery name on each title bar. The currently active window is placed last so that it is on top of all the other windows.
Use Tile Windows to arrange the embroidery windows in the work area. The windows are not overlapped and you can see part or all of each embroidery in each window.
This is the area on which the stitches are drawn and where you make changes to an embroidery. Stitches are drawn in the appropriate colors, but most thread effects are not shown in the active subdesign. The embroideries are shown in either 3D or 2D, with or without stitch points. The background color and texture can be changed using mySewnet™ Configure ![]() .
.
Garment, quilt block or fabric backgrounds may be stored in .vp4 files. They are not shown in mySewnet™ Stitch Editor, except for any fabric backgrounds used in appliqué. Decorations are shown, but may not be edited, except to move or delete the whole subdesign.
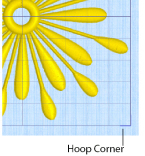
In 3D view ![]() , the real hoop is shown, with blue corners showing the stitch area within the hoop. Movement stitches are hidden. The background texture is shown, if it is selected in mySewnet™ Configure.
, the real hoop is shown, with blue corners showing the stitch area within the hoop. Movement stitches are hidden. The background texture is shown, if it is selected in mySewnet™ Configure.
In 2D view ![]() with and without stitch points, the hoop size is shown by a blue outline with bold corners. Stitches are drawn in plain colors only, and stitches using multicolor threads are drawn using only the first color in the thread definition. Movement stitches are shown as dotted lines. The background does not use texture in 2D view.
with and without stitch points, the hoop size is shown by a blue outline with bold corners. Stitches are drawn in plain colors only, and stitches using multicolor threads are drawn using only the first color in the thread definition. Movement stitches are shown as dotted lines. The background does not use texture in 2D view.
In 2D view with Stitch Points  , black dots or small black squares show the stitch points (needle insertions) in the fabric. The display of the stitch points, whether they are dots or squares, depends on the zoom level. Showing the stitch points may be helpful for inserting new stitches or moving individual stitches. The view mode can be set separately in each embroidery.
Use Ghost Mode ![]() to display pale 'ghost' stitches where there are hidden stitches.
to display pale 'ghost' stitches where there are hidden stitches.
Use Commands ![]() to show or hide the command markers for Color Change
to show or hide the command markers for Color Change  , Stop
  Appliqué
  , and Trim
  .
.
Each embroidery has a grid, which may be turned on or off or shown with numbered grid lines using the grid options ![]() . Zooming in or out makes the grid squares look bigger or smaller, but the grid numbers stay the same size. The grid size can be changed from 2mm to 50mm using the View tab. The grid and numbering can be turned on and off separately in each embroidery window, but changing the grid size affects all windows.
. Zooming in or out makes the grid squares look bigger or smaller, but the grid numbers stay the same size. The grid size can be changed from 2mm to 50mm using the View tab. The grid and numbering can be turned on and off separately in each embroidery window, but changing the grid size affects all windows.
Control Strip
Use the Control Strip to view the colors in the selected section of the embroidery, and to select stitches by number, by color block, or with the handles on the slider bar. Stitches can be hidden for ease of editing or to protect them from being changed by other functions. Also step through the Stop commands in the embroidery.

View how the selected subdesign will be stitched out with the Stitch Player, pausing for Color  , Stop
  and Trim
  commands.
To the right of the work area is the Design Panel. Use the Design Panel to change colors, and to adjust the Notes and Settings.
The Design Information shows the dimensions (Height ![]() and Width
and Width ![]() ), Stitch Count
), Stitch Count ![]() , and number of colors
, and number of colors ![]() for the active embroidery.
for the active embroidery.
The Color Select area shows the order of the color blocks in the color worksheet and any notes that are included in the embroidery. Click on a color block to change thread colors and to add thread effects. Also use the color worksheet to show or hide stitches by color block, to move color blocks up ![]() or down
or down ![]() and merge
and merge ![]() color blocks. Edit or add information to the Notes and Settings as desired.
color blocks. Edit or add information to the Notes and Settings as desired.
The Clipboard Block shows the embroidery that can be pasted into the work area.
Click in the Clipboard to remove the current Clipboard Block.
The overview window gives a small overview of the whole work area for the current embroidery.
The status bar is found at the bottom of the window. Starting from the left, the status bar shows:
-
The selection tools.
-
The horizontal and vertical distance of the mouse pointer from the center of the embroidery.
-
The hoop size.
-
An indicator of the current function, which is blank when no function is active.
-
The zoom tools and Zoom Bar.