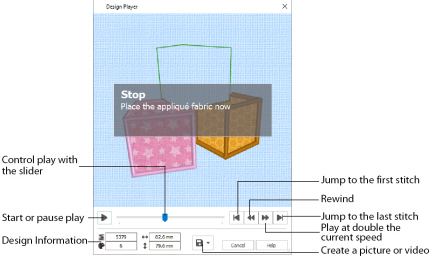
Use Design Player
to play through the stitches in the embroidery as if they were being stitched from an exported embroidery. All parts of the embroidery that are within the hoop area are shown, whether or not they are selected.
The current Optimize for Sewing settings from mySewnet™ Configure are used.
-
Any messages, for example instructions for appliqué placement, are displayed following their Stop commands.
-
Appliqué fabric is displayed if present, but any background garment, quilt block or fabric is not shown.
-
Decorations are shown following their placement stitches.

Embroideries that are outside the hoop are not shown in the Design Player. If an embroidery contains a felting needle, the project will be shown "flipped", as it would actually be stitched.
Share
Use Share ![]() to save a picture or video of your design. See Share Picture and Share Video.
to save a picture or video of your design. See Share Picture and Share Video.
Shortcuts
-
Quick Access Toolbar or Home Tab:

-
Keys: Ctrl + J; Alt, 0; Alt, H, J
Using the Design Player
-
Press Ctrl + N (New) to clear the work area, then click the SuperDesign tab.
-
Choose "Appliqué" from the SuperDesign Category drop-down menu.
-
Click the arrow to the right of the SuperDesign set drop-down menu and choose Children 1.
-
Click the fifth design in the set, Blocks, and click Apply

. The embroidery appears in the work area.
-
Click Design Player

.
The Design Player dialog opens. -
Use the Play button

at the bottom left to start playing through the stitches in the embroidery.
-
Use the controls to play forwards or backwards through the embroidery at different speeds, jump to the start or end of the stitches, and stop at any time.
Press Ctrl and use the mouse wheel to zoom in and out.