Use Bezier Draw  to draw shapes with finely graduated curves. Control the exact shape of the line using the black handles to either side of the points you place.
The points (nodes) for Bezier lines are always square.
Click to place Corner points, or click and drag to place curve points with handles.
For information on Control Points and the other Bezier Line editing tools, see Convert Points.
Creating Bezier Lines
When creating Bezier lines:
-
Click without dragging to create a Corner point (no handles)
-
Click and drag to create a Curve point (the handles are initially symmetric)
Use the Shift key while drawing to affect how the handles are placed:
-
Hold down the Shift key while dragging to place the first handle opposite the position where the key was pressed, and the second handle where the mouse button was released (the handles are asymmetric and can be angled
 ).
). -
Hold down the Shift key before clicking, then drag and release. A single handle is placed where the mouse button was released
 .
.
Editing Bezier Lines
When a point is dragged, its handles move with it, keeping the same angle and distance.
-
The handles on a Curve point can be moved independently along the straight line between the point and handles.
-
Hold down the Shift key while dragging a handle to create an angle at the point between the two handles.

-
Use Insert Points
 and Delete Points
  on the Design Panel to add and remove points from the Bezier line.
Shortcuts
-
Draw Windows Control Panel, Draw:

-
Keys: Alt, P, BM
-
Click the View tab, and ensure that Grid size is set to 10mm, and that the canvas is set to 100mm x 100mm.
-
Click the Draw tab.
-
Ensure that Fill is not selected (Remove Fill Color
 should be highlighted).
 -
Select a color for your line.
-
Click Bezier Draw
 to select (highlight) it. The Bezier Draw pointer appears
  .
. -
Click to place a point, then click to place three more of these square points in a rough curve.
-
Right-click to finish the line. The points are joined by straight lines.
-
Click Undo
 to remove the line.
 -
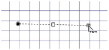
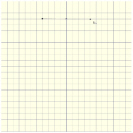
Starting 2 squares above the center of the canvas, click and drag to the right one square, to the crosshairs of the next grid square.
-
Release the mouse button.
A white square (a Point) appears at the placed where you clicked, and a black handle appears at the place where you released the button. This is the forward handle. -
Note that a second handle has appeared the same distance behind the white point.
This is the backward handle, it is the same distance from the white point as the forward handle (it is symmetrical). -
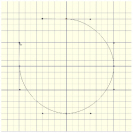
Starting 2 squares to the right of the center of the grid, click and drag downwards one square, then release the mouse button.
-
Starting 2 squares below the center of the grid, click and drag one square to the left to place the next section of the curved line.
-
Then, starting 2 squares to the left of the center of the grid, click and drag one square upwards to place another section of the curved line.
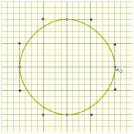
You should now have three quarters of a circle. -
Move the pointer over the square white point on the right. The pointer changes to the Move pointer
 .
. -
Drag the point and place it exactly where the grid lines cross.
-
Move the pointer over the forward handle for that point (the black handle below the point that you just moved).
-
Drag the handle a about half a square downwards. The backward handle for this point moves the same distance upwards.
-
Move the handle to the right and left.
Note that the curved line changes shape as you move the handle. -
Move the forward handle so that both handles are over the cross hairs of the squares above and below the point, and so that the line between the handles runs along the grid line.
-
If needed, adjust the other points and handles so that you have a smooth three quarters curve.
-
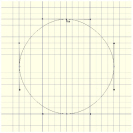
Move the pointer over first point that you placed until it becomes a cross.
-
Click on that original point to form a circle.
Alternatively, right-click and select Finish and Close Line in the context menu to place the line. -
In the Draw section of the Design Panel, click Edit Points
 . The points and their handles are displayed.
 -
Move the pointer over the handle above the point on the right (the backward handle for the second point in the line).
-
Drag the handle a short distance downwards. This time the handle below (the forward handle) does not move, and the shape of the circle distorts.
When editing a line the points are Curved, and not Symmetric. The handles can be moved independently along the straight line. -
Drag the handle up to its previous position and the shape becomes a circle again.
-
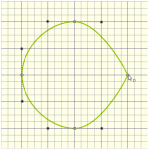
Hold down the Shift key and drag the handle to one side. A corner is created in the shape.
Use the Shift key to create a corner or other angle in the line. -
In the Points section of the Design Panel, select Convert Points to Curve

. The pointer changes to the Convert Points to Curve pointer
 .
. -
Click on the point. The handles become symmetrical, and the shape you drew becomes a circle again.
For more information on Control Points and the other editing tools, see Convert Points. -
In the Points section of the Design Panel, select Convert Points to Corner

.
-
Move the pointer over one of the points in your line. The pointer changes to the Convert Points to Corner pointer
 ..
.. -
Click on the point. It now has no handles, and the sections of the line by it are straight.
There are no handles to drag, so you can only change the line by moving this Corner Point. Use Corner Points for straight lines. -
In the Points section of the Design Panel, select Convert Points to Curve

.
-
Click on the corner point. It changes back to a curved point.
-
Click Edit Points

.
-
Drag the upper handle downwards very close to its point and release the mouse button. The handle vanishes, and the section of the line without a handle becomes straight.
-
Drag the other handle upwards. It also vanishes.
This is another way of creating a corner point. -
Select Convert Points to Curve

and use it to change the corner point back to a curved point.
You can use Convert Points to Curve to regain use of both handles. -
Right-click to deselect Convert Points to Curve.
To create a corner point with full control over the angle of the lines, hold down Shift and click the point. You can then move the handles independently.
To create a flower design from a motif using Bezier lines see Draw a Flower using Bezier Curves.
These are Corner Points, in Bezier Mode they are joined by straight lines.
A curved line appears between the two square white points.
While you are still placing points, if you adjust the handles they behave symmetrically. You can also drag to add symmetrical handles to a Corner point.

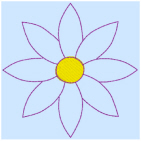
Draw a Flower using Bezier Curves
-
Open mySewnet™ Draw & Paint, and in the View tab ensure that Grid size is set to 10mm, and that the canvas is set to 100mm x 100mm.
-
In the File menu, click Open
 .
. -
Load the picture file 'Motif Flower.png’ from the samples area on the website: www.premierplusecq.com
-
Drag the Background slider to the left so that the picture is very pale.
-
In the Design Panel, ensure that Fill is not selected (Remove Fill Color
 should be highlighted).
 -
Select a color for your line.
-
Set the Line width to 0.5mm.
-
Click Bezier Draw
 to select (highlight) it. The Bezier Draw pointer then appears
  .
.
See Draw a Circle in Bezier Mode for the essentials of drawing Bezier lines. -
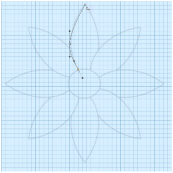
At the left side of the base of the petal at the top, click and drag up and slightly to the left, then release the mouse button.
-
Starting where the petal to the left meets the petal you are drawing, click and drag upwards a short distance to where the next set of grid lines cross.
-
Click (without dragging) to place a point at the tip of the petal. This is a Corner point.
-
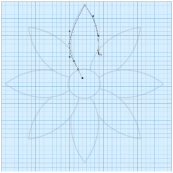
Move the pointer over the second square white point. The pointer changes to the Move pointer
 .
. -
Drag the point a short distance up and to the left, along the outline of the petal until the curved line underneath fits the outline of the drawing.
-
Click and drag downwards a short distance from the mid point of the right side of the petal.
-
Click to place a single point where the line touches the next petal.
As you become more skilled, try clicking and dragging to place a curved line using a single point at the base of the petal. -
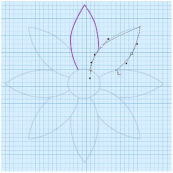
Right-click to place the line.
The curve of the line will probably need some adjustment, but this is better done later, after you have placed lines for the other petals. -
At the left side of the base of the petal to the right of the one that you just drew, click and drag upwards a short distance, then release the mouse button.
-
Starting where the petal to the left meets the petal you are drawing, click and drag diagonally towards the top right corner of the grid.
-
Release the mouse button when you reach the grid line above.
-
Click (without dragging) to place a point at the tip of the petal.
-
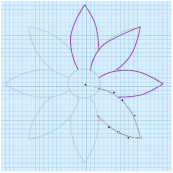
From the mid point of the right side of the petal, click and drag diagonally towards the bottom left corner of the grid.
-
Click to place a single point where the line touches the next petal.
-
Use the Move pointer to adjust the position of the white squares so that the curved line fits the picture behind.
You can further adjust the Bezier line using the black handles. -
Right-click to place the line.
-
Starting at the bottom left of the third petal, click and drag a short distance diagonally to the right to place the first point.
-
Where the outline of the petal meets the grid, click and drag a horizontal line a short distance to the right to place the next part of the curve.
-
Click to place a point at the tip of the petal.
-
Mid way down the other side of the petal, click and drag to the left and slightly down to place the next point.
-
At the base of the petal, click to place a final point, then right-click to place the line.
-
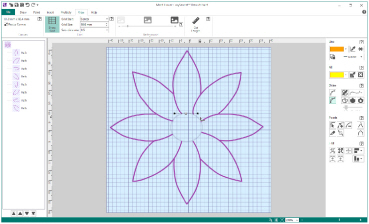
Place Bezier curve lines to draw the other petals, finishing at the petal to the left of where you started.
If you move the black handle to the left or right as you draw, you can place the curve to follow the outline, often with no need for later editing. -
Right-click to finish placing the Bezier line.
-
Click outside the design to deselect the final petal.
-
Click the Line color block and choose a golden yellow color.
-
Click the Fill color block and choose a pale yellow color.
The Fill color changes to your selected color from no color. -
Click Bezier Draw
 to select (highlight) it. The Bezier Draw pointer appears
  .
. -
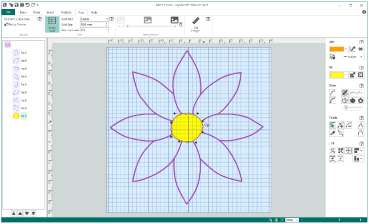
Starting at the top of the center of the flower, click and drag a short distance to the right, then release the mouse button.
-
Click and drag vertical and horizontal lines of similar lengths to place the other three points creating the circle.
-
Right-click to place the center of the flower.
-
Click Edit Points
 . The points you drew for the center of the flower can be seen.
 -
In the FilmStrip, click on each petal in turn, and make a note of the ones you will need to adjust.
-
Adjust the handles on the points to make the Bezier line follow the background.
If the handles from two different points overlap, move both nearer to their own point, to smooth the curve. For more information on editing, see Edit a Bezier Line. -
When you have made your changes on one petal, select the next petal in the FilmStrip and adjust that one.
If you find that one of corner points actually has very short handles, either use Convert to Corner in the Draw tab to change it to a corner, or drag the handles sufficiently close to their point that they vanish.
 -
Save your flower. You can adjust it further when you open the file again.