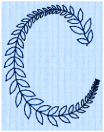
Use Tapered Motifs ![]() to create a line of motifs that varies in size according to the width of the column. Tapered motifs are often used in lace designs.
to create a line of motifs that varies in size according to the width of the column. Tapered motifs are often used in lace designs.

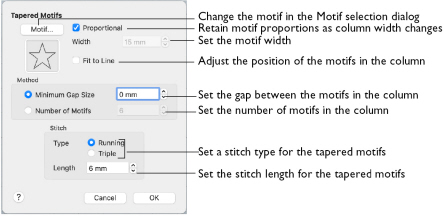
Use the Tapered Motifs dialog to set the motif type, stitch type, and placement method.
Create a Column of Tapered Motifs
-
In the Freehand Create or Point Create toolbar, click Tapered Motifs
 .
.
Alternatively, choose Create > Tapered Motifs (or press ^P). -
Choose Options > Tapered Motifs to set the motif, stitch length and either the number of motifs or the gap between them.
-
Place alternate points on the work area to define the Tapered Motifs column.
-
Press Return to complete the column. It appears in the work area.
-
If desired, Control–click the Tapered Motifs to adjust the settings, or choose a different column type from the popup menu.
Alternatively, select several Tapered Motif columns and change their properties, or select a single Tapered Motif column and use Global Properties to change the properties of all visible Tapered Motif columns. -
Control–click and choose Finish Tapered Motifs to deselect, or simply select another Create tool.
Note: To use Bezier lines instead of placing points, click to enable Bezier Mode ![]() , then draw your Tapered Motifs using Bezier lines. See Draw a column with Bezier Curves.
, then draw your Tapered Motifs using Bezier lines. See Draw a column with Bezier Curves.

Select Tapered Motifs
-
In the Freehand Create or Point Create toolbar, click Tapered Motifs
 .
. -
Choose Create > Tapered Motifs.
-
Press ^P
Motif
Select the motif in the Motif selection dialog.
To select tapered motifs
-
Click the Motif button to open the Motif selection dialog. See Motif Selection.
Note: As the motif size is set by the column width, the size functions are dimmed in the Motif Selection dialog.
Proportional
Use this option to keep the relative height and width of the motif in proportion when the column width is changed. This option is selected by default.
Width
The Width is initially set according to the chosen motif. The maximum and minimum values for Width are individual to each motif.
Fit To Line
Select how the motifs follow the curves of the line.
|
|
|
|
When Fit To Line is off, the ends of each motif are placed on the line. |
When Fit To Line is on, each whole motif is adjusted to fit along the line. |
Method
Minimum Gap Size
The Minimum Gap is the minimum amount of extra stitching that is placed between the motifs along the line. This is in addition to any spacing that is part of the selected motif.
Number of Motifs
Set the number of Motifs from 2 to 50. The initial number is 6.
Stitch
Type
Select Running or Triple stitch for stitching out the motifs.
Length
Set the Length of stitches from 1 to 20mm in steps of 0.1mm. Length is initially set to the recommended value for each motif.

