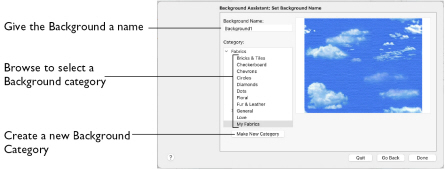
Use Set Background Name to save the finished background in a category and give it a name. The categories are the folder names that you see when browsing for existing backgrounds.

Background Name
If you used an existing picture, the picture name is shown by default as the name for the new background. If you scanned a new picture, it will not have a name so you will need to enter a name.
-
Enter a name for the background in the text box.
Category
Select a Category.
-
Save the background in the MyBackgrounds folder, or browse to another backgrounds folder.
Make New Category
Create a new Category within the selected Category. Enter a name for the new Category.
Note: For example, when adding a Fabric background that is a woven, you might add a category called Woven to the My Fabrics category. This will create a subfolder called 'Woven' within the 'My Fabrics' folder.
Zoom
Use the Zoom bar to change the view of the background. Zoom in to magnify the view. Zoom out to shrink the view. When zoomed in, scroll to move around.
Go Back
If desired, use the Back button to go back through the Background Assistant and modify settings before previewing the background again.
Done
Click Done to save the new background with the specified name in the specified Category and close the Background Assistant. The new background is displayed in the select appliqué area.