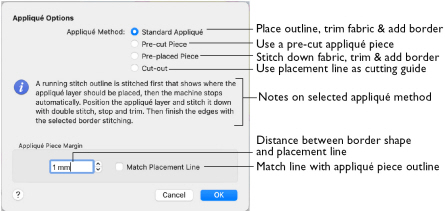
Use the Appliqué Options dialog to select an appliqué method, and choose settings for a Placement Line.

Appliqué Method
Choose the method for placing and securing the appliqué fabric.
Stitch a running line to show where appliqué fabric should be placed, then stop to position the fabric. Stitch down the appliqué fabric with double stitch, then stop so the fabric may be trimmed. Finish the edges with the selected border stitching.
Use a pre-cut appliqué piece; created, for example, using an automatic cutter or cutwork needles.
Stitch a running line to show where the pre-cut appliqué piece should be placed, then stop to position the appliqué piece. Stitch down the appliqué piece with double stitch, then finish the edges with the selected border stitching.
Place the appliqué fabric before stitching.
Place the appliqué layer in position, then stitch down the appliqué fabric with double stitch. Stop so the fabric may be trimmed. Finish the edges with the selected border stitching.
Use the appliqué placement line as a guide to where the fabric should be cut; for example for reverse appliqué.
Stitch a double stitch line. Stop so the fabric may be cut to form a hole defined by the stitched outline. Finish the edges with the selected border stitching.
Appliqué Piece Margin
Set the margin for appliqué placement relative to the drawn border shape (-10mm to 10mm, initially set to 1.0mm).
Note: Use a positive value when trimming the appliqué fabric before the border is stitched, for example with Standard Appliqué and Pre-placed Appliqué. A negative value is recommended for cut-out and reverse appliqué.
Match Placement Line
Adjust the position of the first running stitch line for either Standard Appliqué or Pre-cut Piece so that it matches the outline of the appliqué piece after the Appliqué Piece Margin has been applied.
Note: This may be useful for precise positioning of appliqué pieces that have been pre-cut with an automated cutter, to ensure the placement line is visible.
Stitching Out an Appliqué Area
Appliqué embroideries are designed to be stitched out in a particular sequence. When stitching out an appliqué embroidery using Standard Appliqué, do as follows:
-
Begin embroidering. A running line will show where to position the appliqué fabric.
-
A stop then allows you to place the fabric.
-
Stitch down the appliqué fabric with double stitch.
-
Next there is a color change so you can trim the fabric, and change the color for the first color of the embroidery.
-
Finally, finish the edges with the satin border.
Note: The placement section in the appliqué is the same color as the first color in the design, so it doesn’t show under the appliqué fabric. If desired, change in mySewnet™ Embroidery to the first color of the embroidery.