Use Insert Shape  to select a shape and create a fill area, or line, in that shape. Then adjust its size and properties. Select a fill and line to draw a fill area surrounded by a border, or select a line type only to draw a closed line with no fill.
Draw a ring, a square, a frame or other shape using Insert Shape.
Select Shape
-
In the Insert tab
 of the Design Panel
  , choose a Shape from the pop-up menu, then click the Insert Shape
  button.
Create a Shape
-
Select colors for a line and fill in the Draw tab
 of the Design Panel
  .
. -
Open the Insert tab
 of the Design Panel
  .
. -
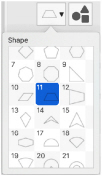
In the Shape section, select a shape from the pop-up menu.
-
Click the Insert Shape
 button to place the shape on the canvas.
 -
Drag one of the square corner handles to resize the shape.
Hold down Shift as you drag to resize proportionally. Hold down the Option key to resize from the center.
Draw a Filled Shape with a Border
-
Select the line and fill colors.
-
Select the type of shape you wish to draw from the Shape pop-up menu.
-
Click the Insert Shape button
 . The shape is placed in the center of the canvas as a selected block.
 -
Drag the shape to the preferred position, and resize it as desired using the square corner handles.
Hold down Shift as you drag to resize proportionally. Hold down the Option key to resize from the center. -
If desired, draw another shape or use Undo and draw the shape again.
Note: To draw an unfilled shape, set Remove Fill Color on the Draw tab when selecting your colors.