Use Insert Lettering  to add text to your picture using any TrueType® or Open Type® font available on your computer. Text is drawn using the selected line and fill colors.

-
In the Insert tab
 of the Design Panel
  select Insert Lettering
  .
. -
Choose Edit > Insert > Insert Lettering.
Insert Lettering into a Design
-
Select colors for a line and fill in the Draw tab
 of the Design Panel
  .
. -
Open the Insert tab
 of the Design Panel
  .
.
-
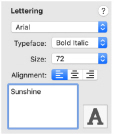
Click the pop-up menu for the font and select the desired TrueType® Font installed on your computer.
-
Click the pop-up menu for Typeface and choose Regular, Bold, Italic or Bold Italic.
-
Set the Size in points by entering a number, or click pop-up menu and choose a point size.
-
Set the Alignment for your lettering.
-
Click in the text box and the arrow cursor becomes an I-bar.
-
Enter some text.
-
Click Insert Lettering
 .
. -
If desired, use the resize handles to make the text bigger or smaller.
-
Click anywhere outside the box to deselect.
Press Return to create a new line and type more text.
The lettering is placed on the canvas. The selection box has handles to adjust it.
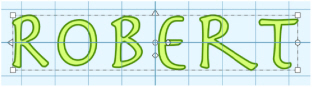
Note: Hold Shift to resize proportionally, and Command to resize from the center. Use the rotate handle to rotate the text.
You can use Multiply to automatically create copies of the text.