Use Find Center Line to reduce the thickness of the selected color area to one pixel only, or to the selected thickness (up to 5 pixels). The new outline will be halfway between the adjoining color areas, as they are widened to allow the selected color to be narrowed. The function works on any continuous color area within the picture, but it is most often used to thin an outline so that there are smaller gaps between areas of the picture. This can produce a more pleasing picture.
The thinning process produces a thinner outline that is more suitable for the QuickStitch™ features in mySewnet™ Digitizing.
Reduce the Thickness of an Outline
-
Click Open

and open ThinEg.bmp from /mySewnet/Samples/Digitizing/Pics.
-
Click Line Finder
 in the Paint window Control Panel, and the Line Finder dialog is displayed.
 -
Click to select Find Center Line.
-
Use Pick Line Color

in the Find Center Line area to select the desired line color from the picture.
-
Click the thick black outline color in the picture.
-
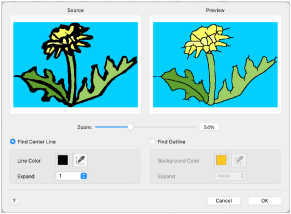
In the preview pane the picture is redrawn with the thickness of the black outline reduced to one pixel. The green and yellow areas have become wider, as has the blue background. The new black outline runs through the center of the old one.
-
When the picture in the preview window at the right appears as desired, click OK.
The black outline around the flower is relatively thick and looks unnatural. Use the Find Center Line to make the black area narrower.
If you do not select a line color with Pick Color, the current line color will be used. If this color is not used in the picture, the Find Center Line will have no effect.
Be careful where you click when using Pick Line Color. The color you click on is the color that will be thinned. If you click on a fill area, this area will be thinned and the outline around it will be thickened to compensate. If the changes are not as desired, click Cancel and try again.
The Find Center Line tool may not work if your picture has dithering, for example a scanned image or one that has been converted from a JPEG file.