Use the block Select functions on the toolbar to select part of an embroidery. A selected part of an embroidery is called a block. A block can be resized, rotated, mirrored, moved, nudged, duplicated, copied, cut and deleted.
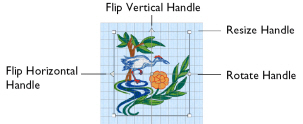
When a block has been selected, it has a selection box around it on the work area. The selection box has handles which are used to resize, rotate and flip the block.
Use Add to Selection
to add an area to your selection, or Remove From Selection
to remove an area from your selection.
Note: You may find it easier to select a block when you have selected colors to display and/or changed the ranges of stitches that are visible.
Move and Modify a Block
-
Drag inside the block to move it, or use the arrow keys on the keyboard to nudge it in small amounts for accurate positioning.
-
Drag the square corner handles to scale the block with constant stitch count (white handles) or resize with constant density (blue handles).
-
Drag the round rotate handle to rotate the block freely.
-
Click the triangular handles to flip the block horizontally or vertically.
Note: You can also resize, scale and rotate a block precisely using the Modify Block ![]() dialog available from the Design window. See Modify Block.
dialog available from the Design window. See Modify Block.
Pasting a Block
-
When a block is pasted into an embroidery it is automatically selected as the current block, and Box Select is activated. The block is attached to the last visible stitch.
Deselecting a Block
-
Click the work area outside a block to deselect it. The selection box around the block disappears.