Use Insert Design to load a saved embroidery into an existing window. mySewnet™ Stitch Editor displays the Open dialog so you can select an embroidery to insert.
Note: Use Insert to load Melco .exp format.
To insert an embroidery
-
Click Actions

on the toolbar and choose Insert.
-
Choose Edit > Insert > Insert Design.
-
Press ⌘I
Insert an Embroidery
-
Click Actions
 on the toolbar and choose Insert. Alternatively, choose File > Insert > Insert Design.
 -
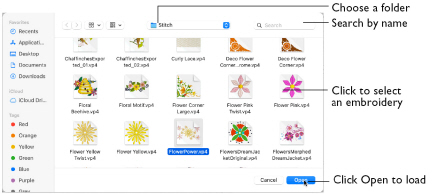
Browse to the desired folder in the Open dialog.
-
Click an embroidery to highlight it.
-
Click the Open button to load the embroidery.
The embroidery is placed in the current window.
File Formats
Use Insert to load the following file formats: Husqvarna Viking / Pfaff (.vp4, .vp3), Bernina (.art version 1, 2, 3), Brother/Baby Lock/Bernina PEC (.pec), Brother/Baby Lock/Bernina PES (.pes version 2 - 11), Compucon/Singer PSW (.xxx), Husqvarna Viking / Pfaff (vip), Husqvarna (.hus and .shv), Janome (.jef and .sew), Pfaff (.pcs), Tajima (.dst), and Toyota (.10*).
Note: Use Insert to load Melco .exp format.
Only Husqvarna Viking / Pfaff (.vp4 and .vp3) embroidery files contain full thread color information that is shown in the original thread colors. Other files that hold some color information, such as .hus, .shv, .pcs, .pes, .sew and .xxx, are shown in the nearest match to the colors in which they were created. The shades are converted to the Import Thread Range, as selected in mySewnet™ Configure. For files that do not store colors, such as .dst, .exp and .10*, the embroidery is shown in a default color sequence, using thread colors from the Import Thread Range.