Use Flood Erase ![]() to remove an evenly colored background. If the photo has a graduated background, such as a cloudy sky, use Flood Erase repeatedly, followed by cleaning with the Large Eraser
to remove an evenly colored background. If the photo has a graduated background, such as a cloudy sky, use Flood Erase repeatedly, followed by cleaning with the Large Eraser ![]() to remove remaining specks. Very detailed backgrounds with varied coloring, such as a street scene, are best removed with the Large
to remove remaining specks. Very detailed backgrounds with varied coloring, such as a street scene, are best removed with the Large  , Medium
 ![]() and Small
and Small ![]() Erasers.
Erasers.
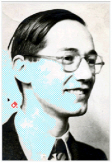
If the face or hair are the same color as the background, Flood Erase may remove them as well.
To prevent this, break the area into two parts with the Small Eraser  , then remove the part that you don’t want.
|
|
|
|
|
The face is the same color as the background, so Flood Erase removes part of it |
|
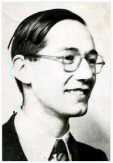
Two short lines drawn with the Eraser separate the face from the background, so it will no longer be removed |
Note: Alternatively, use the editing features in mySewnet™ Draw & Paint, or use the Instant Alpha and Smart Lasso features in the Select popup menu in Preview to remove the picture background. For details, see the topic "Extract an image from its background" in the Preview Help.
A plain, well contrasted background is easy to remove in a picture editor, for example a picture taken against a blue sky, or a brightly painted wall. If the picture was taken against a patterned background, the background color may blend in with the person’s hair. This type of background may take a little longer to remove.