Create a new fill pattern from one of your own designs. Select the pattern to repeat, and use the Create New Pattern button in the Pattern window to open the New Fill Pattern dialog.
Note: The Create New Pattern button is only available if the selection is no larger than 32 grid squares high or wide, and if there are no more than 15 colors in the selection. Also, a blank selection my not be saved as a pattern.
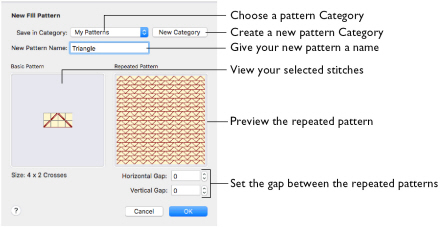
The Basic Pattern shows the area you selected in the design. The Repeated Pattern shows how the pattern will be repeated when it is used to fill an area. View the Repeated Pattern area to ensure the pattern will give the desired result.
To open the New Fill Pattern dialog
-
Select the design to use as a pattern, and in the Pattern window click Create New Pattern. Adjust and name the design as desired.
Create a New Fill Pattern
-
Draw a sample of the pattern you would like to create.
-
Select the sample with Box Select, Freehand Select or Point Select.
-
Click Create New Pattern in the Pattern window of the control panel. The New Fill Pattern dialog appears.
-
Click the pop-up menu for Save in Category and choose the desired Category.
-
Click in the New Pattern Name box and enter a name for the pattern.
-
If desired, adjust the Horizontal Gap and Vertical Gap. The Repeated Pattern shows the effect of adjusting these settings.
-
Click OK and the fill pattern is saved in the chosen Category. It is automatically selected as the current fill pattern on the Pattern tab.
Note: My Patterns is the recommended Category and is always selected when the dialog appears. New Categories can be added as needed.
Note: The maximum Gap size is 32, but the minimum Gap is negative. The Gap can be decreased until each repeat of the pattern overlaps all but one grid square of the previous repeat.