Use the Embroidery Options to choose the settings for the embroidered border, and the background fabric type to embroider on.
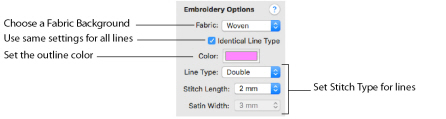
Fabric
Select the fabric to be used for your embroidery design. The Fabric affects the compensation used for the design.
Note: All stitches have a tendency to pull in. The pull varies according to fabric weight and type. Compensation is used to make a whole design or areas within it 'bolder' by increasing their relative size.
To choose a Fabric type
-
In the Fabric pop-up menu, choose a Fabric. Choose from: Sheer, Woven, Knit, Fleece, Terrycloth. The initial fabric is Woven.
Identical Line Type
Use Identical Line Type to create all border lines using the same color and Line Type.
Note: When the Identical Line Type checkbox is checked (selected), the Line Type color and stitch type options become available.
Color
Set the color for your border lines. See Choosing and Changing Colors.
Note: The colors for the fills in a filled embroidery are taken from the colors in the original drawing.
Line Type
Select the stitch type to be used for the border of your embroidery. Choose from: Satin, Double and Quadruple line.
Stitch Length
Select the Stitch Length for Double or Quadruple stitch.
The available options are: 1.0mm, 1.5mm, 2.0mm, 2.5mm, 3.0mm, 3.5mm, 4.0mm, 5.0mm and 6.0mm. The initial value is 2.0mm.
Satin Width
Set the width of a Satin line.
The available options are: 1.0mm, 1.5mm, 2.0mm, 2.5mm, 3.0mm, 3.5mm, 4.0mm, 5.0mm and 6.0mm. The initial value is 2.0mm.
Setting Embroidery Options
-
Create a design.
-
Save the design. See Save As.
-
In the Export Tab
 of the Design Panel
  click Embroidery with Fills
, or another of the embroidery options.
-
Choose a Fabric type from the pop-up menu.
-
Select (check) Identical Lines. The line options become available.
-
Click the color block and select a color from the Colors Window. See Colors Window.
-
Choose a Line Type in the pop-up menu, and set its stitch length or width.
-
Click Export
 . The Export dialog appears.
 -
Select a format from the pop-up menu.
-
Browse to the folder for your designs.
-
Click Save.
Note: The initial fabric type is Woven.
Note: For Double and Quadruple stitch lines you can choose the line length, for Satin you can choose the width of the line.
The embroidery is saved in your chosen folder.