Use Select Fabric  to audition a fabric for your appliqué in the Appliqué Selection dialog box.
In the Stitch Type  drop-down menu, click Select Fabric
  and the Appliqué Selection dialog box appears. See Appliqué Selection.
Shortcuts
-
Appliqué, Frame Tab:

-
Keys: Alt, B, SF
Click Apply

to place the framed embroidery on the work area.
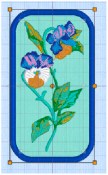
Add a Border with Appliqué to a Flower Embroidery
-
Clear the work area or open a new window.

-
In the Quick Access toolbar, click Insert

.
-
Browse to \mySewnet\Samples\Embroidery \Stitch.
-
Scroll down and click to load "Pansy Stem" into the work area.
The embroidery has white handles on its selection box, showing that it is initially in Scale rather than Resize
mode (blue handles).
-
In the Frame tab, click Border

.
-
In Border Options, select (check) Rounded Corners and ensure that Group is selected.
Group creates a group from the border and embroidery, so that they can be rotated and resized as a single unit. See Group. -
In Border Options ensure that Satin Line

is selected.
-
Click Add Appliqué

to select it.
-
In the Stitch Type

drop-down menu on the right, click Select Fabric

. The Appliqué Selection dialog box opens. See Appliqué Selection.
-
In the Quick Colors select the turquoise in row 1 column 8, then click OK to select the fabric.
-
In the Stitch Type

drop-down menu, click Appliqué Options

.
-
In the Appliqué Options dialog box ensure that Standard Appliqué is selected, then click OK. See Appliqué Options.
-
Click Apply

. The embroidery is surrounded by an appliqué frame.
Note the orange handles and solid outline indicating that the border and embroidery are a group. -
Click Undo

.
-
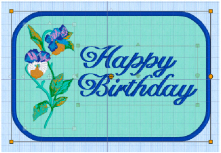
Click the Letter tab.
-
In the Script category, select the font Chateau Uniform 20-30mm, and enter the words "Happy Birthday" on two lines.
-
Click Align Left

, then click Apply

.
-
Move the lettering to the right of the flower.
-
Click the Home tab, then click Select All

. (Alternatively, Ctrl + Click the designs or use Ctrl + A.) Both designs are now selected.
If required, move the selection box to the left so that the designs are in the hoop. -
Click the Frame tab.
-
To the right of the ribbon bar click Apply

.
-
Both designs are framed, but the leaf at the top left is clipped by the rounded corners of the border. Click Undo

.
-
Set the Margin to 10mm, then click the Home tab and select both designs again.
-
Click the Frame tab, then click Apply

. The embroidery and lettering are framed by the border.