Use the Effects ![]() dialog in the Paint tab control panel to change and enhance the picture; for instance, to make certain features stand out or improve the color representation of the picture. Effects act on all, or the selected part, of the picture.
dialog in the Paint tab control panel to change and enhance the picture; for instance, to make certain features stand out or improve the color representation of the picture. Effects act on all, or the selected part, of the picture.
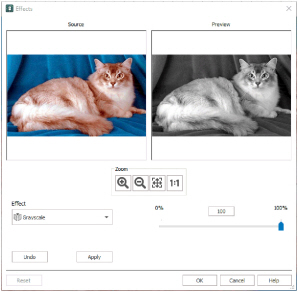
The effect types are:
-
Monochrome

-
Reduce Colors

Zoom
Use the Zoom functions to change the view of the picture.
Use Zoom In

to magnify the view. Move the pointer over the picture and the pointer changes to the zoom in pointer

. Then either click a point you want to zoom in towards, or click and drag a rectangle around the area you want to zoom in to and release the mouse button to zoom. When zoomed in, use the scroll bars to move around.
Use Zoom Out

to shrink the view. Move the pointer over the picture and the pointer changes to the zoom out pointer

. Then click a point you want to zoom out from.
Click Zoom To Fit

to fit the picture to the preview area.
Click Real Size

to view the picture at its real size in pixels. This means that one pixel of the picture uses one pixel of the screen.
Undo
Reset the picture back to the original settings.
Shortcuts
-
Paint Window Control Panel, Edit:

-
Keys: Alt, D, E, L
Select an Effect
-
Click Effects
 in the Paint tab control panel.
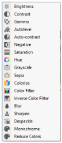
-
In the Effects dialog box, click the drop-down arrow and a list of effects appears.
-
Click the desired effect type. The effect dialog box opens.
-
Adjust the effects until the Preview window at the right appears as desired.
-
Click OK and the effects will be applied.
The Brightness  effect makes the selected part or all of a picture lighter or darker than the original. Use it to lighten pictures that are too dark.
Adjust Brightness from -255 (Dark) to +255 (Light) in steps of 1. The initial setting is 0.
Adjust Brightness for the whole picture, or use Box Select or another selection tool to choose an area of the picture to change.
Change the Brightness of a Picture
-
Click Effects
 in the Paint tab control panel.
 -
In the Effects dialog box, click the drop-down arrow and select Brightness
 .
. -
Adjust the Brightness between -255 and +255 relative to the starting point by typing in a number, using the left and right arrow keys, or by clicking and dragging the slider bar. To brighten the picture, move the slider to the right, use the right arrow key, or type a positive number in the box. To darken the picture, move the slider to the left, use the left arrow key, or type a negative number in the box.
-
When the picture in the preview window at the right appears as desired, click OK.
Click Undo to start again.
The Contrast  effect changes the amount of shading between areas for the selected part or all of a picture. Use it to make specific areas stand out. Adjust Contrast up to +10 or -10 more or less than the original. Increasing the setting will increase the darkness of dark areas and the lightness of light areas.
Adjust Contrast from -10 to +10 in steps of 0.1. The initial setting is 0.
Adjust Contrast for the whole picture, or use Box Select or another select tool to choose an area of the picture to change.
Change the Contrast in a Picture
-
Click Effects
 in the Paint tab control panel.
 -
In the Effects dialog box, click the drop-down arrow and select Contrast
 .
. -
Adjust the Contrast between -100 (Low) and +100 (High) relative to the starting point by typing in a number, using the left and right arrow keys, or by clicking and dragging the slider bar. To increase, move the slider to the right, use the right arrow key, or type a positive number in the box. To decrease, move the slider to the left, use the left arrow key, or type a negative number in the box.
-
When the picture in the preview window at the right appears as desired, click OK.
Click Undo to start again.
Use Gamma  to adjust the brightness and contrast together so that dark areas are made brighter, but bright areas are not overexposed.
Adjust Gamma from 0.2 (Light) to 4 (Dark) in steps of 0.1. The initial setting is 1. Lower values will make the picture appear lighter.
Adjust Gamma for the whole picture, or use Box Select or another select tool to choose an area of the picture to change.
Adjust the Gamma in a Picture
-
Click Effects
 in the Paint tab control panel.
 -
In the Effects dialog box, click the drop-down arrow and select Gamma

.
-
Adjust the Gamma between 2 and 40 by typing in a number, using the left and right arrow keys, or by clicking and dragging the slider bar. To increase, move the slider to the right, use the right arrow key, or type a positive number in the box. To decrease, move the slider to the left, use the left arrow key, or type a negative number in the box.
-
When the picture in the preview window at the right appears as desired, click OK.
Click Undo to start again.
Use Autolevel  to adjust brightness and contrast in the picture automatically. Autolevel improves brightness and contrast in most pictures, and can be used to bring out the color in underexposed pictures.
Use the slider to change the degree of Autolevel. Autolevel is set at 100% initially.
Occasionally Autolevel does not improve the appearance of a picture, and may need to be switched off.
Use Auto-contrast  to adjust the contrast between the bright and dark areas in the picture automatically, while retaining the detail. It can be used to sharpen a hazy picture.
Use the slider to change the degree of Auto-contrast. Auto-contrast is set at 100% initially.
Use Negative  to invert the luminosity of the picture, so that bright areas appear dark, and dark areas bright.
Use the slider to change the amount of inversion of the colors. Negative is set at 100% initially.
The Saturation  effect changes the amount of gray in the selected part or all of a picture. Adjust Saturation between -100 (Gray) and +100 (Bright).
Increasing the setting enhances the intensity of colors in a picture, for instance, to make pale skin tones appear 'warmer'.
Adjust Saturation from -100 (Gray) to +100 (Bright) in steps of 1. The initial setting is 0.
Adjust Saturation for the whole picture, or use Box Select or another select tool to choose an area of the picture to change. To turn part or all of a picture completely gray and create a grayscale effect, set saturation to -10.
Change the Saturation in a Picture
-
Click Effects
 in the Paint tab control panel.
 -
In the Effects dialog box, click the drop-down arrow and select Saturation
 .
. -
Adjust the Saturation between -100 (completely gray) and +100 relative to the starting point by typing in a number, using the left and right arrow keys, or by clicking and dragging the slider bar. To increase, move the slider to the right, use the right arrow key, or type a positive number in the box. To decrease, move the slider to the left, use the left arrow key, or type a negative number in the box.
-
When the picture in the preview window at the right appears as desired, click OK.
Click Undo to start again.
The Hue  effect changes the shades of the colors in the picture. Adjust the Hue between -180 and +180.
This effect makes colors change as if rotated around a color wheel. A small adjustment can make considerable changes to the color of a picture.
Adjust Hue from -180 to +180 in steps of 1. The initial setting is 0.
Adjust Hue for the whole picture, or use Box Select or another select tool to choose an area of the picture to change. To tint a picture with a specific color, use a Color Filter.
Change the Hue in a Picture
-
Click Effects
 in the Paint tab control panel.
 -
In the Effects dialog box, click the drop-down arrow and select Hue
 .
. -
Adjust the Hue between -180 and +180 relative to the starting point by typing in a number, using the left and right arrow keys, or by clicking and dragging the slider bar. To increase, move the slider to the right, use the right arrow key, or type a positive number in the box. To decrease, move the slider to the left, use the left arrow key, or type a negative number in the box.
-
When the picture in the preview window at the right appears as desired, click OK.
Click Undo to start again.
The Grayscale  effect changes all of the color shades in the picture to shades of gray. Adjust Grayscale between 0% and 100% in steps of 1. The initial setting is 100%.
Adjust Grayscale for the whole picture, or use Box Select or another select tool to choose an area of the picture to change.
The Sepia  effect changes all of the color shades in the picture to shades of sepia (reddish-brown). Adjust the Sepia effect between 0% and 100% in steps of 1. The initial setting is 100%.
Adjust Sepia for the whole picture, or use Box Select or another select tool to choose an area of the picture to change.
The Colorize  effect applies a single color to the picture at varying intensities. Use the upper slider to colorize with the selected color as from a color wheel, and the lower slider to fade the effect.
This effect makes colors change as if rotated around a color wheel.
The upper slider adjusts the color from 0 (Red) to 360 (Violet) in steps of 1 via orange, yellow, green and blue. The initial setting is 0 (Red).
The lower slider fades the effect from 100% (fully colorized) to 0% (original colors). The initial setting is 100%.
Use Color Filter  to tint the picture using the selected color and intensity. Only the light from the selected color passes through.
This effect makes colors change as if rotated around a color wheel.
The upper slider adjusts the color from 0 (Red) to 360 (Violet) in steps of 1 via green and blue. The initial setting is 0 (Red).
The lower slider sets the intensity of the color tint. 100% uses only the shades of the selected filter color, and 0% is no tint. The initial setting is 100% (fully tinted).
Use Color Filter for the whole picture, or use Box Select or another select tool to choose an area of the picture to change.
Use a Color Filter
-
Click Effects
 in the Paint tab control panel.
 -
In the Effects dialog box, click the drop-down arrow and select Color Filter
 .
. -
Adjust the color for the filter (upper slider) between 0 and 360 typing in a number, using the left and right arrow keys, or by clicking and dragging the slider bar.
-
Adjust the color tint (lower slider) between 0% (no tint) and 100% (your selected color) relative to the starting point by typing in a number, using the left and right arrow keys, or by clicking and dragging the slider bar.
-
When the picture in the preview window at the right appears as desired, click OK.
Use Inverse Color Filter  to tint the picture in the opposite way to a physical filter using the selected color and intensity. Only the light from the selected color is removed.
This effect makes colors change as if rotated around a color wheel.
The upper slider adjusts the color from 0 (Red) to 360 (Violet) in steps of 1 via orange, yellow, green and blue. The initial setting is 0 (Red).
The lower slider sets the intensity of the color tint. 100% uses only the shades of the selected filter color, and 0% is no tint. The initial setting is 100% (fully tinted).
Use Inverse Color Filter for the whole picture, or use Box Select or another select tool to choose an area of the picture to change.
Use Inverse Color Filter
-
Click Effects
 in the Paint tab control panel.
 -
In the Effects dialog box, click the drop-down arrow and select Inverse Color Filter
 .
. -
Adjust the color for the filter (upper slider) between 0 and 360 typing in a number, using the left and right arrow keys, or by clicking and dragging the slider bar.
-
Adjust the color tint (lower slider) between 0% (no tint) and 100% (your selected color) relative to the starting point by typing in a number, using the left and right arrow keys, or by clicking and dragging the slider bar.
-
When the picture in the preview window at the right appears as desired, click OK.
Use Blur  to blur the edges between differently colored areas in the picture, by smoothing the contrast between pixels adjacent to defined lines and shaded areas. Use the Blur effect to change the focus of a picture, or to remove unwanted detail from part of a picture.
Adjust Blur for the whole picture, or use Box Select or another selection tool to choose an area of the picture to change.
The upper slider adjusts Blur between 0 (Soft) and 3 (Strong) in steps of 1. The initial setting is 0.
The lower slider sets the intensity of the blurring from 0% to 100%. The initial setting is 100%.
Blur a Picture
-
Click Effects
 in the Paint tab control panel.
 -
In the Effects dialog box, click the drop-down arrow and select Blur
 .
. -
Adjust the amount of blurring between0 and 3 by typing in a number, using the left and right arrow keys, or by clicking and dragging the slider bar.
-
Adjust the intensity between 0% (no blurring) and 100% (full effect) by typing in a number, using the left and right arrow keys, or by clicking and dragging the slider bar.
-
When the picture in the preview window at the right appears as desired, click OK.
Use Sharpen  to enhance the edges between differently colored areas in the picture, by increasing the contrast between pixels adjacent to defined lines and shaded areas. Use the Sharpen effect to change the focus of a picture, or to enhance detail in part of a picture.
Adjust sharpness for the whole picture, or use Box Select or another selection tool to choose an area of the picture to change.
The upper slider adjusts Sharpen between 0 (Soft) and 100 (Strong) in steps of 1. The initial setting is 0.
The lower slider sets the intensity of the sharpening from 0% to 100%. The initial setting is 100%.
Sharpen a Picture
-
Click Effects
 in the Paint tab control panel.
 -
In the Effects dialog box, click the drop-down arrow and select Sharpen
 .
. -
Adjust the Sharpness between 0 and 100 by typing in a number, using the left and right arrow keys, or by clicking and dragging the slider bar.
-
Adjust the intensity between 0% (no sharpening) and 100% (full effect) by typing in a number, using the left and right arrow keys, or by clicking and dragging the slider bar.
-
When the picture in the preview window at the right appears as desired, click OK.