Use the Clone ![]() tool to copy a color and texture from one part of a picture to another. The Clone tool is useful for editing out unwanted features in a photo, or stamping a motif on part of an image.
tool to copy a color and texture from one part of a picture to another. The Clone tool is useful for editing out unwanted features in a photo, or stamping a motif on part of an image.
Right-click and select Reset Origin from the context menu, or press the Ctrl key, to reset the origin point when cloning.
|
|
|
|
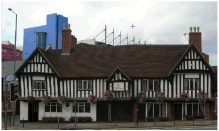
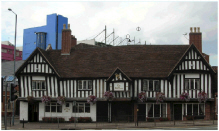
Place the origin pointer |
Remove unwanted details |
Use Persistent Offset for Clone Tool in Preferences to change the behavior of the origin point. See Persistent Offset for Clone Tool.
When set, the origin moves with the pointer when lifted. Otherwise, the origin point reverts to its original position each time the pointer is lifted.
Shortcut
-
Paint Window Control Panel; Tools:

Using the Clone Tool
-
Load a photo or picture for editing.
-
Choose the brush size.
-
Choose the type of brush for copying.
-
Click the Clone
 tool, and move over the Canvas. The crosshairs pointer
can be seen.
-
Move the pointer over the area that you want to copy from.
-
Click the area to be copied.
The Clone pointer appears .
. -
Move over the area that you want to cover with the copied color and texture.
-
Paint the area with the borrowed color.
-
Lift the pointer frequently if copying large areas.
-
Right-click and select Reset Origin Point from the context menu to use the crosshairs pointer to select a new area to copy from.
A small brush will take longer, but help with detail.
Clone is most easily used at 100% Intensity, and with a solid edged brush such as Circle.
For a smooth shading between copied and original areas, use a soft brush such as Soft Circle, or a lower Intensity.
Use a single click with Clone to stamp an area, or paint with Clone to mask unwanted areas in a photo.
The copied area is refreshed each time the pointer is lifted, so lift frequently when copying cloned areas.
Alternatively, press Ctrl to reset the origin.