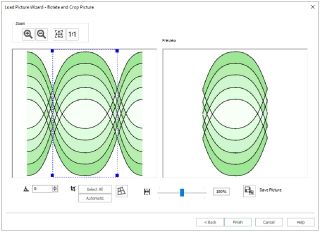
Use the Rotate and Crop Picture page to select the section of the picture that is to be used to create the appliqué background. If required, rotate the picture, and click and drag the boundary line of the crop area to select the desired part of the picture.
Click and drag anywhere inside the crop box to move the crop box.
If you need to expand a crop box again, make sure it is not touching the edge of the frame, as this will stop it expanding.
When the desired area is selected, click Finish.
Rotate
Rotate

the picture from 0 to 359 degrees. Adjust the picture angle as desired. This is often necessary with scanned pictures.
Enter the desired Rotation angle

or use the up/down arrows to change the angle. The preview will show the effect.
When the picture is rotated between the 90 degree steps, the picture is made larger and white background is added.
Select All and Automatic
Use Select All to select the whole of the picture. Use Automatic to set the crop lines back to the default position for the current picture.
To remove the effects of perspective in a picture, or to correct skew, select Perspective Correction

. When using Perspective Correction, the crop handles are red.
Move the red handles so that the crop lines frame the picture. Use the Zoom tools to view the outline of the picture more clearly. Drag the Stretch Picture

slider to make the picture in the Preview wider or narrower. Use Save Picture

to save your edited picture.
Use the Zoom functions to change the view of the picture.
Use Zoom In

to magnify the view. Move the pointer over the picture and the pointer changes to the zoom in pointer

. Then either click a point you want to zoom in towards, or click and drag a rectangle around the area you want to zoom in to and release the mouse button to zoom. When zoomed in, use the scroll bars to move around.
Use Zoom Out

to shrink the view. Move the pointer over the picture and the pointer changes to the zoom out pointer

. Then click a point you want to zoom out from.
Click Zoom To Fit

to fit the picture to the preview area.
Click Real Size

to view the picture at its real size in pixels. This means that one pixel of the picture uses one pixel of the screen.
Back
Return to the Choose Picture page.
Finish
Use the selected image for the appliqué