Use Align Origin Handles  to align the patterns or focal points of multiple fill areas. It places the orange origin
  handles of the fill areas in the same position as the handle of the object that is last in the stitching order.
Align Origin Handles is useful when aligning fill patterns for Pattern Fill or focal points for Shape, Radial and Spiral Fill.
Shortcuts
-
Object Tab; Modify Object:

-
Keys: Alt, O, A
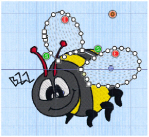
Align the Stitching in Bumblebee Wings
-
Click File, New
 to open a new window.
 -
In the Quick Access toolbar, click Insert
 .
. -
In the folder Documents\mySewnet\Samples\Stitch Editor\Stitch load the 'Bumblebee 2' embroidery.
-
Click the Object tab. The pointer changes to the Object Select pointer.
-
Move the pointer until the upper wing is highlighted, then click to select it.
-
In the Modify Object area, click Remove Underlying Stitches
 .
. -
Then click the lower wing to select it and click Remove Underlying Stitches
 .
.
The end stitch number in the Control Strip is now lower.
Remove Underlying Stitches removes any underlay stitches, or other stitches, under a fill area. This will enable you to see the stitch lines in the Spiral Fill you are about to create clearly. -
Select the upper wing, then use Ctrl + click to select the lower wing.
-
In the Convert drop-down list, select "Pattern Fill to Spiral Fill". The Spiral Fill properties dialog box appears.
-
In the Options tab, set Density to 15 and click OK. The bumblebee’s wings now use spiral fill.
-
Click Align Origin Handles to align the origin handles for the selected areas.
-
Move the orange origin handle
 above the lower wing. The spiral pattern for both areas follows the origin point.