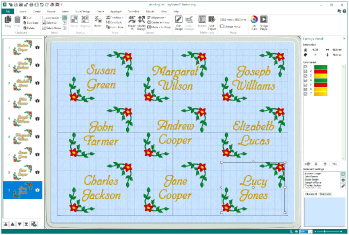
Design a template embroidery with some lettering, then select the piece of lettering to be changed, and use Name Changer  to create multiple versions of this design with varying words. Export the designs as individual embroideries.
Enter the desired names, or paste in a list of names. Then use the Previous

and Next

buttons to view the created designs.
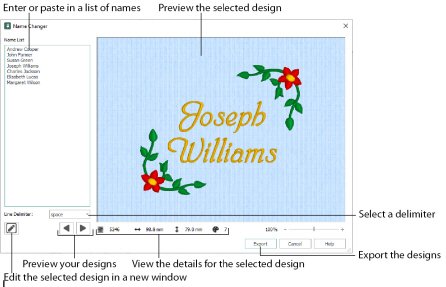
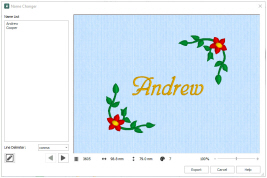
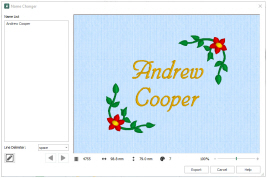
Name List
Type a list of names, or paste in a list from a word processor or spreadsheet.
Your word list will still be available if you re-open Name Changer during the same session.
Line Delimiter
Choose a delimiter to break the text onto two lines. Choose from a Comma, Tab, Space or None.
In the picture above, the space was used as a delimiter to place the names on two lines.
Edit in a New Window
Use Edit in a New Window  to open the selected design in a new window, for example if a frame needs adjusting around a name that is too long, or too short.
Save the edited embroidery from that window.
Previous and Next
Use Previous

and Next

to view the automatically created designs. The Design Information shows the number of stitches and other details for the previewed design.
Design Information
View the design information for the selected design.
Export
Export the complete set of designs.
The design name will be created from the name of your template design, followed by the text for the name concerned.
Create a Template Design for use with Name Changer
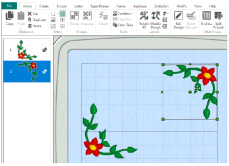
First, create the base design for your changing text, and save it as a template. This design uses two SuperDesigns to frame the lettering to be changed. Use a 100 x 100 hoop.
-
In the SuperDesign tab, select the first design in the Corners Category, and click Apply twice.
-
On the upper of the two copies, click the horizontal and vertical flip handles to form the upper part of a frame. Then move the SuperDesign copies to create the frame.
-
Click the Letter tab.
-
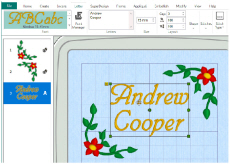
In the Font Gallery, scroll down to the Script Category, and select the font Nimbus 15-45mm.
-
In the Letters text box, enter the name "Andrew".
-
Press the Return key to start a new line, and then enter "Cooper".
-
Press Apply.
-
Move the text to between the two parts of your frame.
The two lines of text here can be used as two lines of text in your designs. They could also be used with the Full Circle lettering shape to place text above and below an embroidery. -
Make any other edits to the template, such as matching the design and lettering colors.
-
Save your design as "Place Name Template" for future use.
-
Select the lettering to be changed in your design. Then, in the Home tab, click Name Changer
 .
. -
In the Line Delimiter drop-down menu select "space".
-
Then, in the Name List place a space after "Andrew", and delete the line break before "Cooper".
-
Enter several more names in the Name List text box, with a space between the two parts of the name.
-
Use the Previous

and Next

buttons to move through the designs.
-
If a design does not look right, for example if it touches the frame, click Edit in a New Window
 , and adjust it in the new mySewnet™ Embroidery window. Then save your adjusted design.
 -
If several embroideries look wrong, close Name Changer and adjust your template so that the names will fit better. Save the template, then open Name Changer again.
-
When you are happy with your automatically created set of embroideries, click Export. See Export.
-
In the Export dialog box, choose your file format (for example .vp3) and then click OK. The Save As dialog box is displayed.
-
In the Save As dialog the name of your template design is shown - here "Place Name Template". Shorten the name, for example to "Place Name", as the name in your list will be added to that design’s name.
-
Click Save to generate the designs, one for each name.
-
Use Windows Explorer to check that the designs have been created, and to look at them.
-
Before closing down mySewnet™ Embroidery, open Name Changer again.
-
Select your list of names, then use Ctrl+C to copy it. Close Name Changer.
-
Select the lettering in your template embroidery, and ensure that Notes
 is selected in the Design Panel.
 -
Click Edit
 , then paste the list of names into the Notes (Ctrl+V). Click OK to close the Notes.
 -
Save the template embroidery with your list of names.
Use your Template Design with Name Changer
If the design was Grouped, use Reveal Groups  and then select the lettering.
Note that the design as it was loaded only contains the first name - this is because the second name has been used for the second design. Use Line Delimiter to change this.
Both names are now shown.
Use the comma or tab delimiter when pasting in a list of names from a spreadsheet, or a formal word processed document.

Note that the design information for each design is shown below the preview.
You can remove the name from your list, or remove the automatically created embroidery from the set of Exported embroideries before you stitch out.
Reopen the template file and add more names, or use a completely different set of names with that template for a different collection of designs.
You can use the Alignment tools to place the embroideries together in a large hoop for stitching out together on non-fraying fabric, then trim as desired.