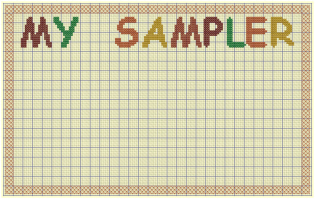
Create Title Text for a Sampler
-
In the Appearance tab of mySewnet™ Configure

, set the Background to RGB 255, 255, 204, and set the Texture to Aida.
-
Open mySewnet™ Cross Stitcher

. The Cross Stitch Design Wizard opens at the Design Options page.
-
In the Design Options page select Load Existing Cross Stitch Design, and then click Next.
-
In the Open Existing Design page, click Load a Design

and browse to Documents\mySewnet\Samples\Cross Stitch\Krz\MySamplerBorderOnly.krz. Click Finish to close the wizard.
-
In the View tab, ensure that Every 5 Lines

is selected.
-
Click the Letter tab on the ribbon bar.
-
On the left of the Letter tab, click TrueType Font.
-
Select Comic Sans MS as the Font, select Bold from the Style drop-down menu, and set the Size to 20.
-
In the Fill area, ensure Cross Fill

is selected and Smooth is unchecked.
-
Click the thread color for Fill, and in the pop-up palette click Add Color

. The Color Selection dialog box appears.
-
Ensure that Robison-Anton Rayon 40 is selected as the Thread Range.
-
In Find Thread enter 2334 (this will select Robison-Anton Rayon 40 2334 Terra Cotta). Click OK.
-
Press CAPS LOCK on the keyboard and enter 'MY', two spaces then 'SAMPLER' in the Text box. Press CAPS LOCK again to turn it off.
-
Click Apply and the text appears at the top left of the design area.
-
Click and drag the text to place it in the center, two grid squares below the top border, with four squares on either side.
-
Click the Create tab.
-
At the left of the ribbon bar, click the thread color for Crosses, and in the pop-up palette click Add Color

. The Color Selection dialog box appears.
-
Click the green in the Quick Colors in row 2, column 6 and Robison-Anton Rayon 40 2580 Green Grass is selected. Click OK to choose this color.
-
Click the Cross Flood Fill icon

and the pointer changes to the paint bucket

. Click the 'Y' and 'L' in MY SAMPLER. They are filled with the green.
-
In the Design Panel click the second color (Robison-Anton Rayon 40 2289 Rust). At the left of the ribbon bar, the thread color for Crosses changes to this color.
-
With this color selected, click the 'S' and 'E'.
-
At the left of the ribbon bar, click the thread color for Crosses, and in the pop-up palette click Add Color

. The Color Selection dialog box appears.
-
Enter 2596 in the Find Thread box, Robison-Anton Rayon 40 2596 Marine Gold is selected and click OK. Then click the 'A' and 'R'.
-
At the left of the ribbon bar, click the thread color for Crosses, and in the pop-up palette click Add Color

. The Color Selection dialog box appears.
-
Enter 2581 in the Find Thread box, Robison-Anton Rayon 40 Old Dark Tex Orange is selected. Click OK. Then click the 'M' in the middle of 'SAMPLER'.
Alternatively, use the design you created in Draw and Fill a Cross Stitch Border.
If a different color is selected, click the drop-down arrow to the right of the Quick Colors and ensure that the Standard theme is enabled.
To add a decoration to this title with Multiply, see Create a Decoration for a Sampler Title with Multiply.
After completing this exercise, you can use the Appearance tab of mySewnet™ Configure

to set the Background Color back to the default blue (RGB 211, 233, 255), and to change the texture to Woven.
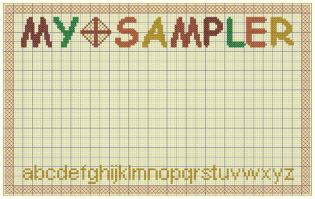
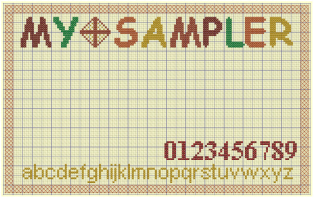
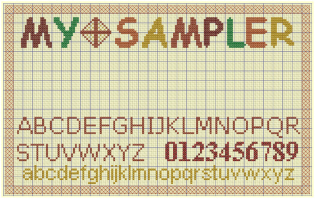
Add Letters and Numbers to a Sampler
-
In the Appearance tab of mySewnet™ Configure

, set the Background to RGB 255, 255, 204, and set the Texture to Aida.
-
Open mySewnet™ Cross Stitcher

. The Cross Stitch Design Wizard opens at the Design Options page.
-
In the Design Options page select Load Existing Cross Stitch Design, and then click Next.
-
In the Open Existing Design page, click Load a Design

and browse to Documents\mySewnet\Samples\Cross Stitch\Krz\MySamplerBorderTitleDecorated.krz. Click Finish to close the wizard.
-
In the View tab, ensure that Every 5 Lines

is selected.
-
Click the Letter tab in the ribbon bar.
-
Ensure that TrueType Font is selected.
-
Change the Font to Arial, and ensure that Style is set to Regular.
-
Set the Size to 11.
-
In the TrueType Font Colors section, select Cross Fill

and No Outline

.
-
Click the thread color for Fill, and in the pop-up palette click color number 5 (this will select Robison-Anton Rayon 40 2596 Marine Gold).
-
In the Letters box, enter 'abcdefghijklmnopqrstuvwxyz', then click Apply

.
-
Click and drag the text to the bottom of the design, so the bottoms of the 'g', 'p', 'q' and 'y' are one square up from the border, and the ’a’ is 5 squares to the right of the left border. The selection box will overlap the border. Click outside the selection box to set the text in place.
-
In the Letter tab, change the Font to Times New Roman, and set the Style to Bold.
-
Set the Size to 14.
-
In the Text box, change the text to '0123456789'.
-
In the TrueType Font Colors section, select Pattern Fill

and ensure that No Outline

is selected.
-
Click the Pattern tab in the ribbon bar.
-
Select Cross Basic as the Category, then click Check 1 in the pattern gallery.
-
There are two colors for the pattern. Click the first color and the Color Selection dialog box will appear.
-
The color is currently set to Robison-Anton Rayon 40 2461 Wheat. Enter 2263 in the Find Thread box (Robison-Anton Rayon 40 2263 Foxy Red) and click OK.
-
Click the Letter tab in the ribbon bar.
-
Click Apply

.
-
Click and drag the text to position it so that the '3' is two squares above the lowercase 't' and the '9' is two squares from the border on the right.
-
Click outside the selection box to set the text in place.
-
Change the Font to Verdana, and set the Style to Regular.
-
Set the Size to 12.
-
In the TrueType Font Colors section, select Cross Fill

and No Outline

.
-
Click the thread color for Fill, and in the pop-up palette click color number 6 (this will select Robison-Anton Rayon 40 2581 Old Dark Tex Orange).
-
Press CAPS LOCK on the keyboard and, in the Letters box, change the text to 'STUVWXYZ'.
-
Click Apply

.
-
Click and drag the text to position it two squares above the lowercase letters and two squares from the border on the left. Click outside the selection box to set the text in place.
-
In the Letters box, change the text to 'ABCDEFGHIJKLMNOPQR'. Press CAPS LOCK to turn it off.
-
Click Apply

.
-
Click and drag the text to position it in the middle and so that the tail of the Q is two squares above the numbers. Click outside the selection box to set the text in place.
-
Click the Create tab.
-
In the Shape section, select Cross Fill

and Cross Outline

.
-
Click the thread color for Fill, and in the pop-up palette click color number 6 (this will select Robison-Anton Rayon 40 2581 Old Dark Tex Orange).
-
Click the thread color for Outline, and in the pop-up palette click color number 3 (this will select Robison-Anton Rayon 40 2334 Terra Cotta).
-
In the Shape drop-down menu, select shape 2, a circle.
-
Click Place Shape

. A circular shape is placed in the center of the design area.
-
Hold down Ctrl, and click and drag one of the corner handles until the circle is 5 squares wide.
-
Drag the circle into the gap between the Z and 0.
-
Click Zoom To Rectangle

and the arrow pointer changes to the zoom in pointer

.
-
Click and drag around the gap between the Z and 0.
-
Right-click to place the shape.
-
Click Zoom To Fit

.
-
Click Save As

and the Save As dialog box appears.
-
In the Save As dialog, change the folder to Documents\mySewnet\My Designs if necessary. Enter the file name 'My Sampler Text' and click Save.
Alternatively, use the design you created in Create a Decoration for a Sampler Title with Multiply.
Holding down Ctrl keeps the proportions.
The final shape is the nearest to a circle that can be made at this size.
This provides a text sampler that you can decorate later, starting from your 'MySamplerText.krz' design.
To add filled shapes to this sampler, see Draw Filled Shapes for a Sampler.
After completing this exercise, you can use the Appearance tab of mySewnet™ Configure

to set the Background Color back to the default blue (RGB 211, 233, 255), and to change the texture to Woven.