The Color Selection dialog box appears when you change an existing thread color or select a new thread color. It is also used in the Load Design Wizard to choose the first thread color for new embroideries.
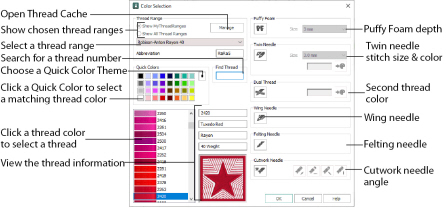
You may choose any thread shade from the available thread manufacturers' palettes (for instance, Sulky Rayon 40 or Robison-Anton Cotton 50) or a thread you have added to My Threads. Select colors by visual selection or by typing in a shade number. Alternatively, click one of the Quick Colors to select the nearest matching thread color. Once the desired color is selected, click OK. Optionally, add a thread or needle effect to the selected color block.
Change a Thread Color
-
To add a new color, use Add Color Change
 or Pick Color
  . To change a color, click a color you wish to change in the color worksheet. The Color Selection dialog box will appear.
 -
If required, change the thread range. Select the desired thread range from all thread ranges or only MyThreadRanges. The available shades for the thread range will be shown in the list.
-
Click a color in the list to select a thread shade visually. Use the scroll bar to browse through the list of threads.
-
If you know the shade number, click in the Find Thread box then type the required shade number.
-
Alternatively, choose a Quick Color Theme then click the desired Quick Color. The nearest shade that is available from the current thread range will be selected.
-
If desired, add a thread or needle effect. Then click OK to confirm the color selection. The dialog box closes, and your changes are displayed in the work area.
The Abbreviation shows the reference used for the thread range when threads from that range are added to My Threads.
This is also a quick way to jump to threads of that color (for example, click light yellow in the Standard Theme to jump to light yellow thread shades).
Click Manage to manage your threads in mySewnet™ Thread Cache.