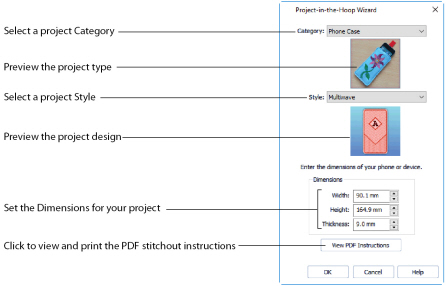
Using the Project-in-the-Hoop Wizard
Select a design Category and a Style, then enter the Dimensions of your project. Click the View PDF Instructions button to view and print a copy of the PDF stitchout instructions.
After you click OK to select the project, read the instructions in the PDF, view how the project is constructed in the Design Player  , and then make any customizations to the main design in the work area.
Ensure that you change only the decorative embroidery, and not the construction stitching. Preserve the order of the sections of the project.
Use the Tab key to step between the sections of the project.
Change the color of the construction stitching, and the decoration, to suit your fabric.
Save  your project, and then stitch it out in a suitable hoop, following the instructions.
Create a Phone Case Project
-
Click File at the top left to open the Welcome screen.
-
In the Welcome screen, click Blank Canvas
 to start a new project. The Hoop selection dialog opens.
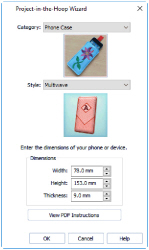
-
Set the hoop size to 260mm x 200mm - Universal Large Hoop 3, and set Orientation to Natural. Click OK.
-
Click the Create tab.
-
In the Create tab, click Project-in-the-Hoop
 . The Wizard opens.
 -
In the Category drop-down menu, choose Phone Case.
-
In the Style drop-down menu, choose Multiwave. The phone case style is displayed.
-
Click the View PDF Instructions button. A PDF of the instructions is displayed.
-
Scroll down to view the instructions, and if desired print or save a copy.
To view the instructions again later, reopen the Wizard, select the same Category, and click View PDF Instructions. -
Measure the phone, then enter the Width, Height and Thickness of the phone in the text boxes.
-
Click OK to load the project into the work area.
The hoop is considerably larger than the design. You can use a smaller hoop. -
In the Quick Access toolbar click Change Hoop
 , and set the hoop size to 240mm x 150mm - Universal Large Hoop 2, with Orientation set to Natural.
-
On the FilmStrip, click Reveal Groups
 . The handles on the project become green, and contents of the Group can be seen in the FilmStrip.
The project is created as a Group. Use Reveal Groups to customize part of it. -
In the FlimStrip, click to select the letter A embroidery.
The thread colors in the Color Select panel indicate whether a gray structural section, or a red decorative section is selected. -
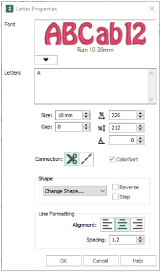
Right-click the A embroidery, and choose Properties in the context menu. The Letter Properties dialog box is displayed.
-
In the Letters text box, change the initial to that of the phone’s owner.
-
Click the drop-down arrow below Font, and in the font gallery scroll up to the Modern Category.
-
Select the font Rian 10-30mm.
To squeeze more letters into the space, choose a smaller font, and adjust the lettering shape with the Handles menu. -
Click OK to close the Letter Properties dialog box.
The pink for the letter is too similar to the color of the other stitching. A darker color would work better. -
In the Design Panel, double-click the pink for the letter. The Color Selection dialog box opens.
-
Select a stronger color in the Quick Colors, and choose a final color among those near to the color that you selected.
-
Click OK to view the changed color.
-
Click the red MultiWave Fill stitching in the FilmStrip. It is selected in the Color Select area.
-
Right-click the stitching, and in the context menu select MultiWave Fill, and MultiWave Fill 1.
This is the fill for the bottom part of the phone case. -
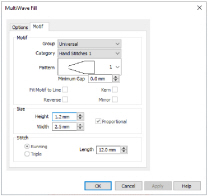
In the MultiWave Fill properties dialog box, select (check) Use Motifs, then click the Motif tab.
-
Select a motif Category and Pattern.
-
Reduce the size of the motif to suit the small size of the phone case., then click OK to view your changes.
-
Right-click the stitching, and in the context menu select MultiWave Fill, and MultiWave Fill 2.
This is the fill for the top part of the phone case. -
In the MultiWave Fill properties dialog box, select (check) Use Motifs, then click the Motif tab.
-
Select a motif Category and Pattern, and set the size as desired. Click OK.
-
In the Quick Access toolbar, click Design Player

.
-
Play through the design to see how it will be stitched out.
You can also print a worksheet to view the structure of the project.
Click Save to save your project, Export
  it for your embroidery machine, then stitch it out.