Use Stop  to create a Stop command that is used to tell the embroidery machine to stop without a color change, and use the Stop properties dialog box to add a message to the Stop command. The Stop command is shown by a small red circle with an S
  .
.
A common use for the Stop command is to pause the machine while a piece of appliqué fabric is placed in the hoop, then again after it is tacked down with running or double stitch so the excess material can be trimmed before satin borders are used to cover the edge of the fabric.
To delete a Stop, select the Stop command, then click the Delete icon  , use the Delete key or right-click in the FilmStrip and select Delete.
To select a Stop, click near it and use the left and right arrow keys to select it, or select it directly in the FilmStrip. It will be highlighted in the FilmStrip.
To view Stop commands with their messages, use the Design Player, or view them in the printed worksheet.
Shortcuts
-
Freehand Create Tab; Point Create Tab, Command:

-
Keys: Alt, R, P; Alt, P, P; Right-click FilmStrip, O
Insert a Stop Command
-
Open a design, then click the Freehand Create or Point Create tab.
-
Move to the position in the FilmStrip where you want to place the Stop command.
-
Click Stop
 . A Stop command is inserted at the selected position. It is shown by a small red circle with an S
  .
. -
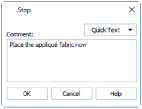
Right-click on the Stop command in the work area, and the Stop properties dialog box opens.
Alternatively, right-click the Stop command in the FilmStrip and select Properties. -
Use the Quick Text drop-down menu to insert a stitchout hint, or enter a message. See Stop Properties.
-
Click OK to save the text.