Curved Crosshatch Fill — Motif
The selected Motif is only used by the Curved Crosshatch Fill if the Motif Line option is selected on the Options tab.
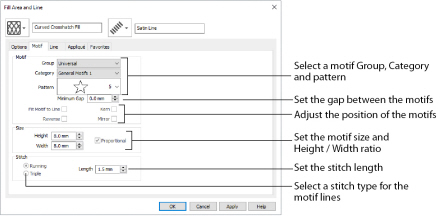
Motif
Click the drop-down arrow to select the desired group of motif patterns.
Click the drop-down arrow to select the desired category of motif patterns.
Click the drop-down arrow to select the desired motif visually. Motifs are also numbered for convenient reference.
The Minimum Gap is the minimum amount of extra stitching that is placed between the motifs along the line. This is in addition to any spacing that is part of the selected motif.
Select this option to make the shape of the motifs follow the curves of the line.
|
|
|
|
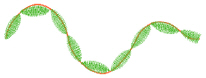
When Fit To Line is off, the ends of each motif are placed on the line. |
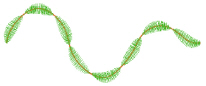
When Fit To Line is on, each motif is adjusted to fit along the line. |
Use this option to reverse the direction of the motif along the line. Some motifs are symmetrical and will have no apparent change when they are reversed.
Use Kern to automatically increase the space between adjacent motifs where necessary, so that the motifs fit along the line without overlapping.
Use this option to mirror the motif across the line of motif fill. Some motifs are symmetrical and will have no apparent change when they are mirrored.
The Height and Width are initially set according to the chosen motif. The maximum and minimum values for Height and Width are individual to each motif.
Use this option to keep the relative Height and Width in proportion when either is changed.
Select Running or Triple stitch for stitching out the motifs. Set the maximum stitch Length from 1 to 12mm in steps of 0.1mm. Length is initially set to the recommended value for each motif.
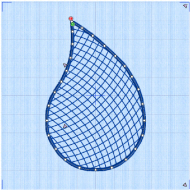
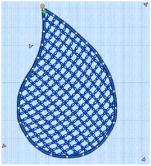
Curved Crosshatch Fill in a Teardrop
-
Click File, New

, or File, New Window

, and in the Express Design Wizard, select the bottom option, Start a New Design with no Picture, then click Next twice.
-
In the Design Size page, set the hoop to Universal, 100mm x 100mm - Universal Square Hoop 1 and click Finish.
-
Click the Quick Create tab.
-
Ensure that the Fill and Line buttons are selected, and that Appliqué is not selected.
-
In the Fill drop-down menu select Curved Crosshatch Fill, and in the Line menu select Satin Line.
-
In Options, click Fill Area and Line to open the Fill Area and Line dialog box.
-
In the Options tab, set Gap to 3.5mm.
-
In the Line tab set Width to 1.5mm.
-
Click OK to close the Fill Area and Line dialog box.
-
In the Shape drop-down list, select Shape 76, a teardrop.
-
Click Shape

. A curved crosshatch fill area appears on the work area in a selection box with blue handles. The crosshatch follows the curves of the shape.
-
Hold down the Ctrl and Shift keys, and drag a corner handle to enlarge the teardrop from the center so that the teardrop is about 80mm high.
-
Right-click outside the selection box.
This deselects the Box Select function.
The teardrop now has four pink triangular handles.
Check that all of the pink handles are within the hoop. -
Click and drag the handle at the bottom left towards the bottom left corner of the hoop. The vertical crosshatch lines become less curved.
-
Click and drag the handle at the bottom right towards the top right corner. The horizontal lines curve towards the top.
-
Right-click the fill area and select Properties in the context menu. The Fill Area and Line properties dialog box opens.
-
Use the title bar on the properties dialog box to drag it one side, so that you can see the teardrop.
-
In Style, select Parallel, then click Apply. The fill is now curved vertical lines.
-
Select Square, then click Apply to return to the original style.
-
In Spacing, set the Gap to 4.0mm, then click Apply. The lines are now further apart.
-
In Lines 1 set Curve In and Curve Out to 0%, then click Apply. The horizontal hatching in the fill now consists of straight lines.
Setting Lines 2 to 0% as well would form a square grid. Lines 1 and 2 set the initial curve of the lines in the fill. Use the pink handles to adjust the curves within the shape. -
In Stitch Type, note that several line types are available. Select Motif Line, then click the Motif tab.
-
Set the Group to Universal and the Category to Hand Stitches 1. Pattern 1, a chain stitch pattern, is selected automatically.
-
Set the Height to 1.0mm. The Width will automatically change to 2.5mm because Proportional is selected.
-
Click Apply. The Curved Crosshatch Fill now uses a motif in the stitch lines.
-
Adjust the lines in the fill further, as desired.
The four handles enable you to adjust the curves of the lines in the fill. Use the handles to make the curves in the fill follow the outline of the shape.
The Style options set the type of parallel or crosshatched fill. Use Angle to set the angle for the lines.
Use Gap to set the distance between the crosshatch lines.
Use Curved Crosshatch Fill for intersecting patterns and 3D effects.